


Where gardening, homesteading, family, and simple sustainable living all come together.


The Importance of Soil Health for an Organic Garden: A Living Entity Beneath Our Feet

When thinking of an organic garden, many imagine vibrant greens, flourishing vegetables, and the fragrance of fresh herbs. However, the true lifeblood of any organic garden lies beneath the surface — the soil. Often underestimated, soil is not just dirt but a living entity teeming with microorganisms, organic matter, and nutrients that work together to nourish your plants. In North Carolina, where gardening thrives across various microclimates, understanding and nurturing soil health is critical to growing a bountiful organic garden.
Why Soil Health is Essential
Healthy soil is the foundation of any successful garden, especially an organic one. Unlike conventional gardening, which relies on synthetic fertilizers and pesticides, organic gardening depends entirely on the soil's natural ability to support plant life.
Healthy soil is:
Nutrient-rich: Provides plants with essential nutrients like nitrogen, phosphorus, and potassium.
Full of life: Hosts beneficial microbes that break down organic matter and improve soil structure.
Well-balanced: Maintains the right pH level and texture to support plant roots.
A water regulator: Retains moisture while allowing proper drainage, preventing root rot.
Without robust soil health, even the best gardening techniques can fall short.
Soil: A Living Ecosystem
Did you know that a single teaspoon of healthy soil contains more microorganisms than there are people on Earth? Soil is alive with bacteria, fungi, protozoa, and even earthworms that play crucial roles in plant health. These organisms help recycle nutrients, combat plant diseases, and create soil structure, making soil more than just an inert medium for plant roots.
By treating your soil as a living organism, you cultivate a garden that thrives naturally without relying on chemical inputs.
Why You Should Get Your Soil Tested
Soil testing is the first step in understanding what your soil needs to support your organic garden. A soil test provides insights into:
pH levels: Soil pH affects nutrient availability. In North Carolina, soils can vary widely, often leaning toward acidic. Most vegetables prefer a pH between 6.0 and 7.0.
Nutrient levels: The test identifies deficiencies in essential nutrients like nitrogen, potassium, and phosphorus.
Organic matter content: Knowing how much organic material your soil contains helps you decide on composting needs.
Micronutrients: Elements like calcium, magnesium, and sulfur are critical to plant health but are often overlooked.
How Often Should You Test Your Soil?
For most organic gardens in North Carolina, testing your soil every 2-3 years is sufficient. However, if you’re starting a new garden, transforming your soil organically, or noticing issues with plant health, an annual test can be beneficial. Frequent testing ensures you’re addressing deficiencies promptly and making adjustments as needed.
How to Test Your Soil in North Carolina
North Carolina residents are fortunate to have access to resources like the North Carolina Department of Agriculture and Consumer Services (NCDA&CS) Agronomic Division, which provides affordable soil testing services. Here’s a step-by-step guide:
1. Collecting a Soil Sample
Gather tools: Use a clean trowel or soil probe and a bucket.
Choose sampling areas: Collect soil from several spots in your garden to get a representative sample. Avoid areas that are overly wet, near compost piles, or have been recently fertilized.
Dig to the right depth: For most gardens, dig 6-8 inches deep.
Mix and dry: Combine the soil samples in the bucket, removing debris like rocks and roots. Spread the soil on newspaper to air-dry for a day.
2. Submit Your Sample
Package about 1 pint of dry soil into a soil sample box, available from your local Cooperative Extension office.
Complete the NCDA&CS soil sample form, detailing your crop or garden type.
Send the sample to the NCDA&CS Soil Testing Laboratory.
3. Interpreting Your Results
Once your results are ready, you’ll receive a report outlining your soil’s pH, nutrient levels, and recommendations for amendments. These can guide your organic practices, such as adding compost or lime to adjust pH.
DIY Soil Testing for Specific Nutrients
While laboratory tests provide the most accurate results, you can perform basic tests at home for quick insights.
Testing Soil pH
Materials: Distilled water, white vinegar, and baking soda.
Mix soil with distilled water to form a slurry.
Add vinegar to the slurry. If it bubbles, your soil is alkaline.
Add baking soda to another slurry sample. If it fizzes, your soil is acidic.
Nitrogen Levels
Use a home soil test kit available at garden centers. These kits usually involve mixing soil with a chemical reagent that changes color based on nitrogen content.
Organic Matter Content
The “jar test” involves placing soil in a glass jar with water, shaking it, and letting it settle. Organic matter floats, while sand, silt, and clay settle in layers.
Building Organic Soil Health
Once you understand your soil’s condition, improving its health is the next step. Here’s how to enrich your North Carolina soil naturally:
1. Add Organic Matter
Use compost made from kitchen scraps, yard waste, or local sources.
Incorporate well-rotted manure for added nutrients.
2. Practice Crop Rotation
Rotating crops prevents nutrient depletion and disrupts pest cycles.
3. Plant Cover Crops
Cover crops like clover or rye replenish nutrients and improve soil structure.
4. Avoid Over-tilling
Tilling disrupts soil organisms and compacts soil over time. Use minimal tilling techniques.
5. Mulch Regularly
Apply organic mulches, such as wood chips or straw, to retain moisture, suppress weeds, and add nutrients as they decompose.
Organic Gardening in North Carolina: Unique Challenges and Solutions
North Carolina’s diverse climate zones — coastal, piedmont, and mountain — influence soil composition and gardening practices. Coastal soils may have high sand content, while piedmont soils often lean toward clay. Each type requires tailored organic amendments to optimize growth.
Coastal: Add organic matter to improve water retention.
Piedmont: Mix sand and compost to enhance drainage and aeration.
Mountains: Ensure adequate pH adjustment using lime for acidic soils.
Nurturing soil health isn’t just about growing plants; it’s about cultivating a sustainable, thriving ecosystem. By viewing soil as a living entity and investing time in testing and improving it, you’re laying the groundwork for a lush organic garden that gives back more than it takes. Start with your soil, and watch your garden — and the joy of gardening — flourish.

March 2026 Daily Nature Activity List
Mar 1 – Moon Gazing & Storytime (Last Quarter 🌗)
Activity: Begin the month by looking at the waning moon. Tell a story about change and cycles as you notice how the moon’s shape changes night to night.
Why it matters: Tonight’s Last Quarter Moon reminds us that not everything grows — sometimes things gently release. Take a few minutes after dinner to look at the half-lit moon together. Talk about how the moon changes shape little by little, just like we do.
This is a beautiful moment to ask your child: “What is something you’re ready to let go of this month?” Maybe it’s frustration, fear of trying something new, or even winter grumpiness.
Watching lunar phases nurtures scientific curiosity while teaching emotional resilience. Children begin to understand that change isn’t sudden — it’s gradual and natural.
Nature models balance for us constantly. The moon doesn’t rush its cycle, and neither do trees preparing for spring. Observing these patterns builds patience, perspective, and comfort with transition.
Mar 2 – Mud & Seed Mix
Activity: Mix a small cup of mud and seeds and squeeze it into a ball. These “seed bombs” can be planted as the soil warms, connecting kids to growth and renewal.
Why it matters: Making seed bombs is messy, magical science. When children mix soil, clay, and seeds together, they’re participating in the cycle of renewal.
This simple activity builds curiosity about how plants grow while strengthening sensory exploration. Kids feel texture, moisture, and temperature — learning through their hands.
It also teaches patience. Seeds don’t sprout instantly. Growth requires time, light, and care — just like children do.
Planting seed bombs in bare spots invites conversation about beautifying shared spaces. It encourages environmental responsibility and reminds children that even small acts can create big change.
Mar 3 – Color Walk
Activity: Take a walk and find five shades of green — from moss to fresh grass.
Why it matters: Spring doesn’t arrive loudly — it whispers. Today, search for five different shades of green.
This activity strengthens observation skills and challenges children to look closer. Moss green is different from grass green. Bud green differs from evergreen.
When children learn to notice subtle differences in nature, they also grow in empathy. They begin to understand that differences are natural, valuable, and beautiful.
Curiosity begins with noticing.
Mar 4 – Listening to Life
Activity: Stand still for two minutes and listen — birds, wind, rustling branches. This builds mindfulness and deepens nature awareness.
Why it matters: When children focus on sound, they strengthen mindfulness and attention span. Listening builds emotional regulation and helps kids slow their racing thoughts.
They may hear birds returning, wind shifting, or distant community sounds. This reminds children they are part of something larger.
Listening teaches respect — for nature and for others.
Mar 5 – New Moon Quiet Time (🌑)
Activity: Enjoy a brief quiet outdoor moment after sunset. At New Moon, darkness can be a time for reflection and calm.
Mar 6 – Home for the Birds
Activity: Make simple bird feeders with string and pine cones dipped in peanut butter and seeds. This helps kids see how animals prepare for changing seasons.
Mar 7 – Earth Texture Hunt
Activity: Explore soils, moss, bark, and stones. Compare textures and describe how each feels — strengthening sensory awareness.
Mar 8 – Celebrate Women in Nature (Int’l Women’s Day)
Activity: Talk about women naturalists (Jane Goodall, Wangari Maathai, local plant scientists) while identifying signs of spring. This honors diverse contributions and inspires curiosity.
Mar 9 – Bud Watch
Activity: Find a branch with buds and make quick daily drawings to track progress. This nurtures patience and observational skills.
Mar 10 – Cloud Shapes
Activity: Look at the sky together — what shapes do you see? This nurtures imagination and connection to seasonal weather patterns.
Mar 11 – Stick Sculptures
Activity: Collect sticks and build shapes or letters. This fine motor activity builds creativity rooted in nature.
Mar 12 – Quiet Sit Spot
Activity: Sit quietly in a favorite spot and notice 3 new things. This nurtures mindfulness and deep observation.
Mar 13 – New Growth Paintings (First Quarter 🌓)
Activity: Use found petals, grasses, or soil pigments to make little nature-inspired paintings. This blends art with curiosity about seasonal changes.
Mar 14 – Flower Scavenger List
Activity: Look for tiny signs of bloom — wierdly shaped leaf, flowering mulch, tiny buds. Teaches anticipation and curiosity.
Mar 15 – Community Street Cleanup (Club Event)
Activity: Bring gloves and a caring heart! Picking up litter helps our parks and streets feel welcoming for all. Kids learn community service and environmental stewardship. Celebrate with high fives and gratitude after.
Mar 16 – Spring Sound Hunt
Activity: Walk quietly and note all the sounds you hear — birds, insects, wind, feet on grass. Sound builds deep presence.
Mar 17 – Shamrock Search (St. Patrick’s Day)
Activity: Hunt for clover or patchy greens with shamrock shape. Celebrate wonder in small green treasures — because sometimes magic is really nature smiling back at us.
Mar 18 – Ladybug Watch
Activity: Spot ladybugs or other insects warming up in spring sun. Talk about how insects help plants grow — tiny but mighty!
Mar 19 – Root Peek Walk
Activity: Find exposed roots on a trail and observe how they anchor trees. Talk about stability and growth — both in nature and in ourselves.
Mar 20 – Spring Equinox Observation
Activity: Today day and night are equal length! Watch sunrise and sunset, or just talk about balance — a perfect moment to celebrate Earth’s rhythm.
Mar 21 – Full Worm Moon Walk (🌕)
Activity: Under the moonlight, look for earthworms in moist soil — worms “wake up” as soil warms. Celebrate the return of soil life!
Mar 22 – Spring Blooms Hike Day (Club Event)
Activity: Hike together and notice which flowers are emerging. Take photos or make tiny sketches. Celebrate resilience, diversity, and seasonal change!
Mar 23 – Acorn & Seed Sorting
Activity: Gather various seeds and sort by size or type. This sparks curiosity about plant life cycles.
Mar 24 – Kindness Leaf Notes
Activity: Write compliments or kind words on fallen leaves and deliver them to neighbors or park benches — nature meets kindness!
Mar 25 – Spring Season Welcome Event (Club Event)
Activity: Gather for songs, games, and outdoor connection. Celebrate community and nature’s renewal.
Mar 26 – Ground Color Palette
Activity: Collect natural bits to make your own “spring palette” — bark, petals, stones. Notice how color signals change.
Mar 27 – Shadow Walking
Activity: Notice how shadows lengthen as the day warms. This blends science and play!
Mar 28 – Sip & Smell Herbs
Activity: Smell any herbs you have: rosemary, mint, sage. Talk about how smell connects to memories and seasons.
Mar 29 – Easter Nature Basket Hunt
Activity: Hide natural treasures (feathers, pretty rocks, seed pods). Celebrate joy and discovery.
Mar 30 – Water Whisper
Activity: Visit a stream, puddle, or fountain and listen. Water is always sharing stories.
Mar 31 – Walk & Reflect
Activity: Take a slow end-of-month walk and talk about one thing you noticed this month that surprised you — honoring curiosity and gratitude.
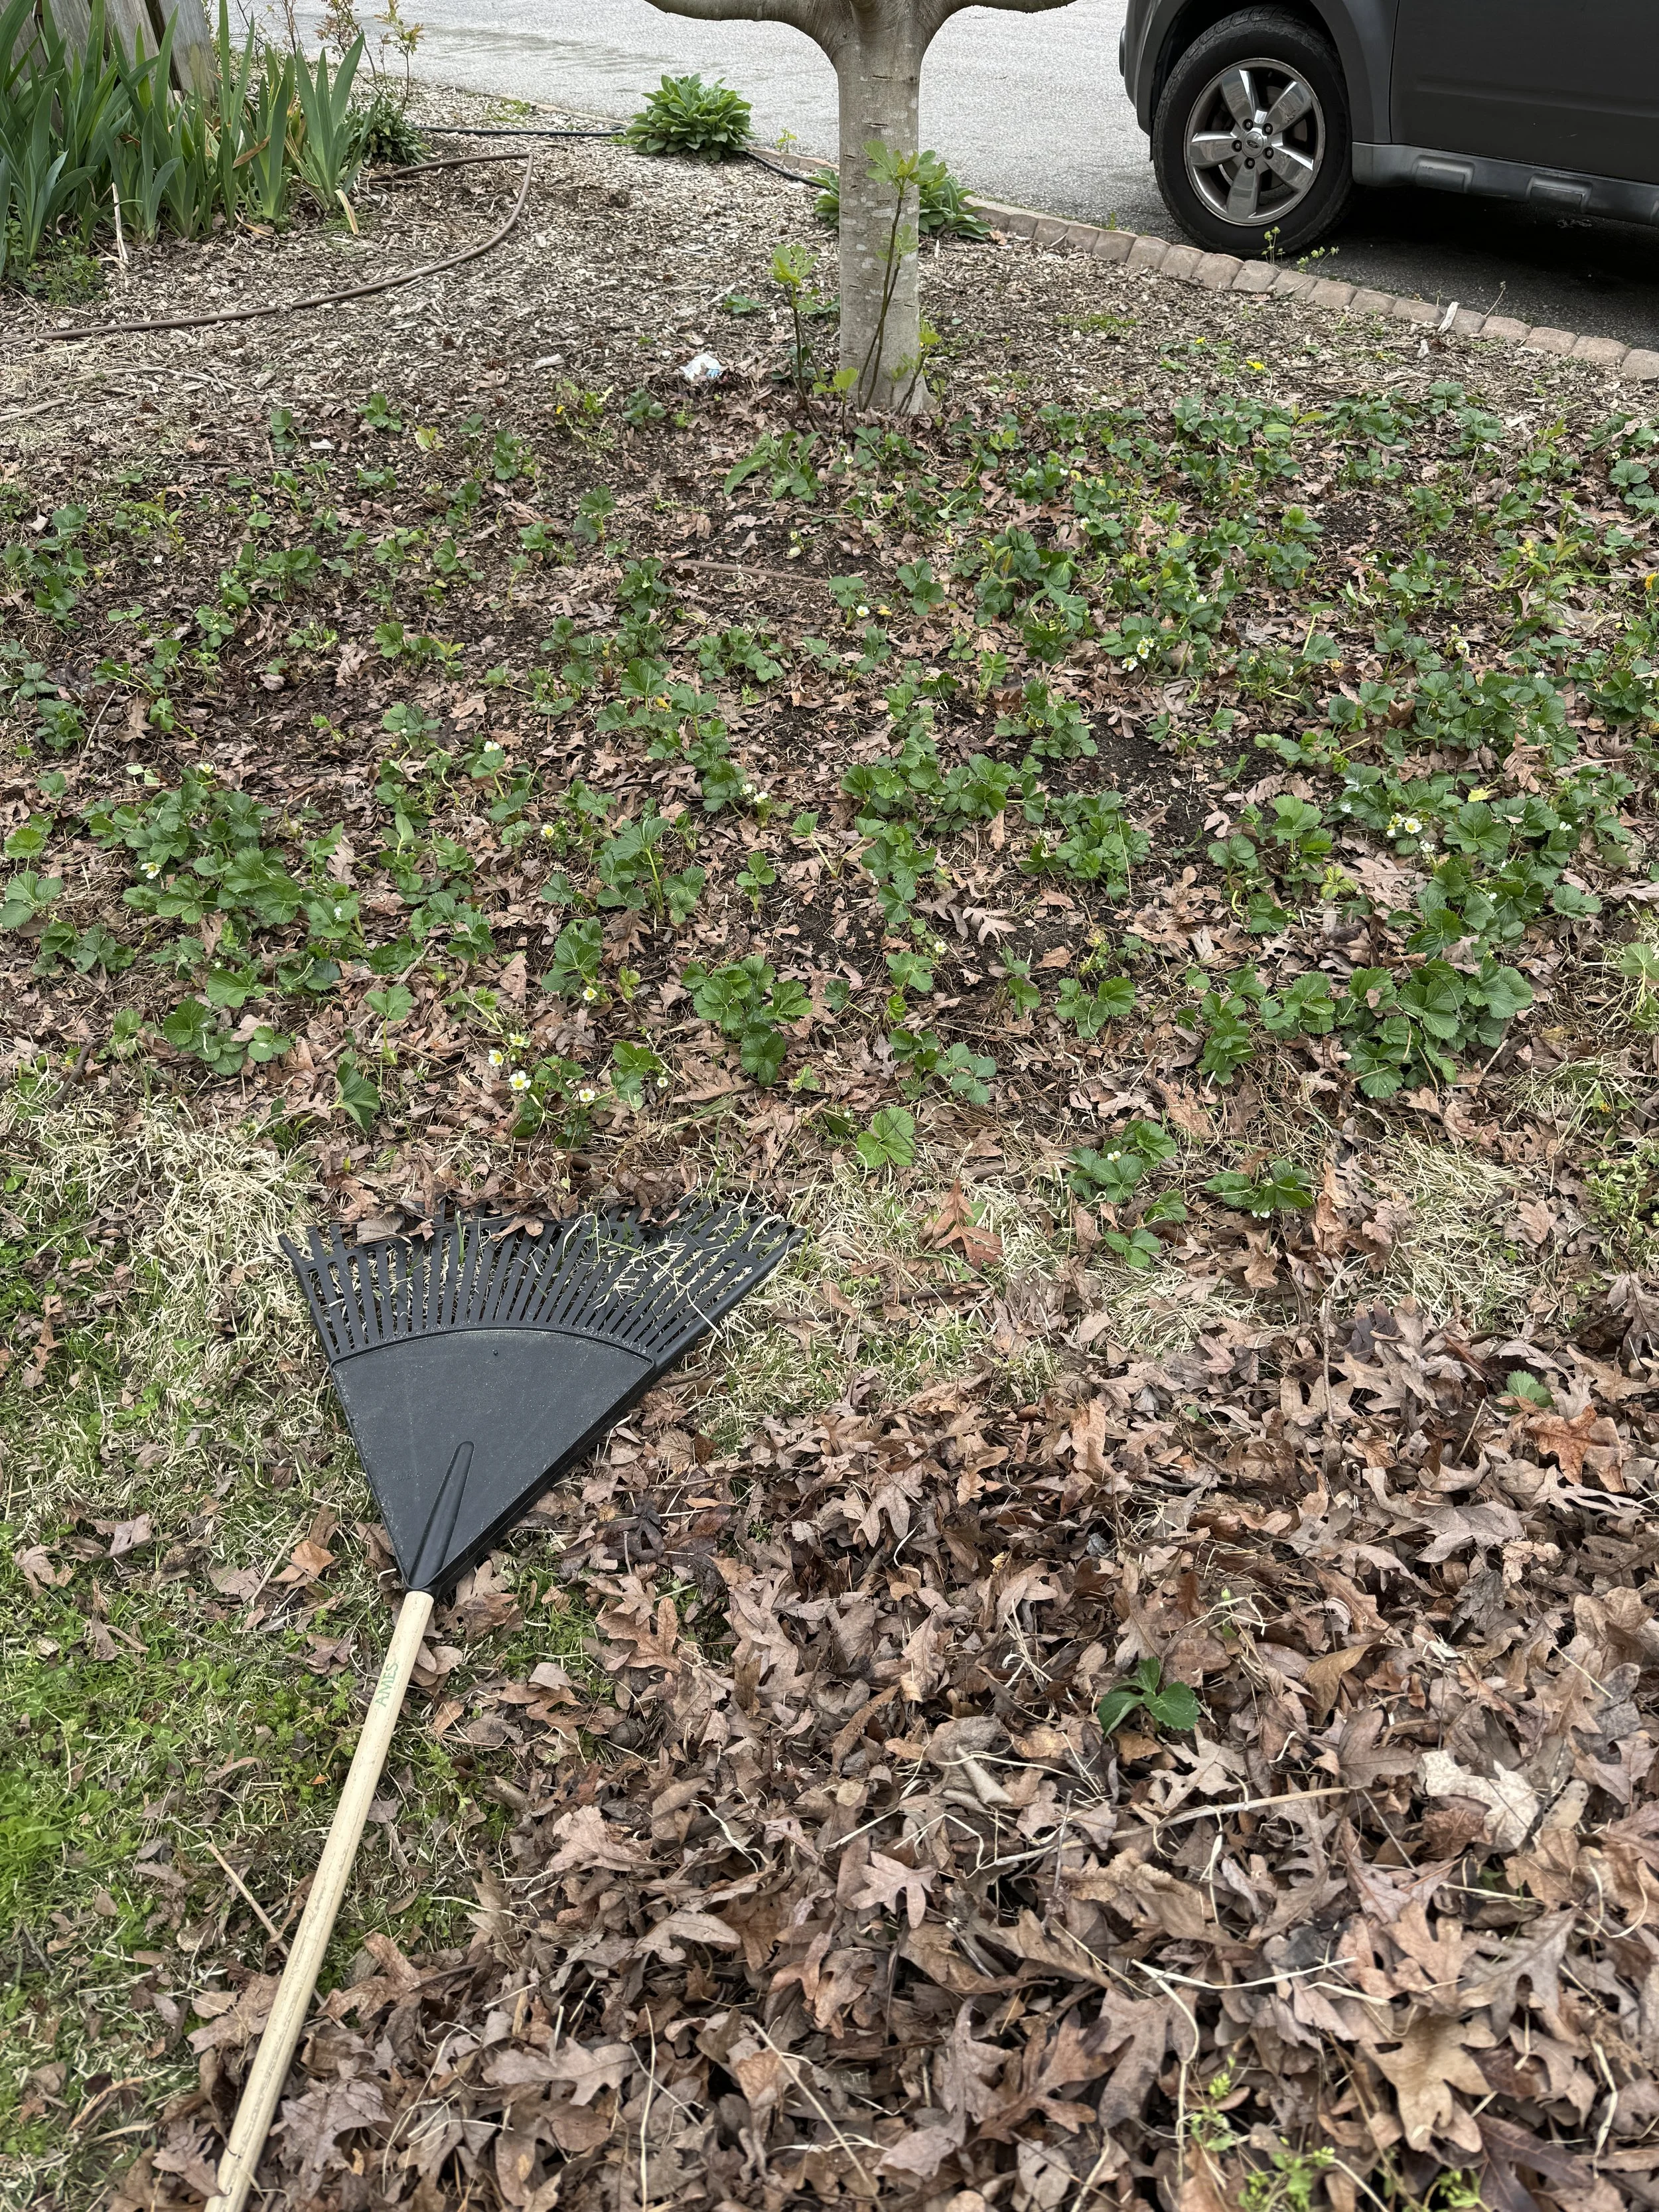
Raleigh’s Leaf Collection Is Changing — Here’s What You Need to Know
Every fall and winter, thousands of Raleigh residents dutifully rake their colorful leaves to the curb, awaiting city crews to vacuum them away. But that familiar seasonal service is about to change — and in a big way.
Every fall and winter, thousands of Raleigh residents dutifully rake their colorful leaves to the curb, awaiting city crews to vacuum them away. But that familiar seasonal service is about to change — and in a big way. The City of Raleigh has announced that 2025–2026 will be the final season of traditional loose-leaf collection, and beginning in Fall 2026, it will be replaced with a weekly yard waste pickup service.
If you live in Raleigh and want to know how this impacts your yard work, your schedule, and even your neighbors down the street — you’re in the right place. Let’s break it down.
What’s Changing? Loose Leaf Collection Ends
For decades, Raleigh Public Works has used vacuum trucks and designated leaf collection zones to sweep up piles of leaves from city streets once or twice per season. This fall/winter service typically runs from November through February, with crews covering all 12 zones in the city on a rotating schedule.
But now, city officials have decided that this seasonal pickup will be discontinued after the 2025–2026 season. Instead, starting Fall 2026, residents will receive weekly yard waste pickup year-round, covering leaves, grass clippings, and small yard trimmings in one dependable weekly service.
Why Is Raleigh Making This Change?
There are a few reasons behind this shift:
1. Reliability and Consistency
Loose leaf collection has long been a seasonal service — meaning residents sometimes had to wait weeks before their zone was serviced. With weekly yard waste collection, there won’t be long gaps between pickups, and crews will run on a predictable weekly schedule.
2. Cleaner Streets & Safer Walkways
Large piles of leaves on streets and sidewalks can clog storm drains, cause slippery conditions, obscure curbs, and even create hazards for walkers and bikers. Weekly pickup helps keep debris off our streets and out of drainage systems.
3. Efficient Use of City Resources
As Raleigh grows, it becomes harder and more costly to run the slow, vacuum-based leaf collection system citywide. Weekly collection using standard yard waste carts and biodegradable bags lets crews service material more effectively and frees up crews for other important services.
Not exactly green motivations from the city’s standpoint — but hey, if your tree-loving heart rejoices that leaves will hopefully get composted more often instead of hauled off — you’re not alone.
How Residents Will Be Affected
Here’s what you need to know:
Final Loose Leaf Season
This current season (2025–2026) is your last chance to rake leaves to the curb for traditional pickup. Make sure your piles are placed properly — not in the street — and check Raleigh’s schedule so crews come by before leaves decompose or blow away.
👉 Find your leaf collection schedule and zone here:
https://raleighnc.gov/transportation/services/seasonal-loose-leaf-collection
Weekly Yard Waste Begins Fall 2026
Instead of waiting for vacuum trucks once or twice per season, you’ll be able to use your yard waste cart (and up to 15 biodegradable paper bags at the curb) every week — even during leaf season. This makes staying on top of yard debris easier and less stressful.
What You Can Do Now
You don’t have to wait until 2026 to use yard waste carts for leaves — most residents can already put leaves in their cart or biodegradable bags for collection on their regular yard waste day.
Why This Matters (to You & the Planet)
Whether you’re a practical planner or an eco-enthusiast, this change matters:
No more guesswork about when leaf trucks are coming through.
Weekly service keeps streets and drains clearer sooner.
Leaves can be composted or mulched more easily, returning nutrients to your soil.
It encourages less waste, more recycling of yard materials.
At Carolina Homestead, we’re cheering on the shift — not just for convenience, but for how it nudges people toward more sustainable yard care. (Yes, even if the city wasn’t exactly doing it for the planet!) 🌿
Landscape Humor: Good News for Landscapers
Let’s be honest — landscapers are secretly thrilled. With yard waste no longer magically disappearing on two designated leaf-pickup days each year, more homeowners will call in professionals to help manage raking, bagging, and hauling those massive leaf piles. More work for local crews means more local business — let’s leaf that joke here. 😉

Be Ready, Not Rattled: How to Prepare Your Family for Natural Disasters and Severe Weather in Raleigh, NC
Severe weather and natural disasters are becoming more common—and more unpredictable. From winter storms and hurricanes to flooding and power outages, being prepared is no longer optional; it’s an act of care for your family, your neighbors, and your community.

Severe weather and natural disasters are becoming more common—and more unpredictable. From winter storms and hurricanes to flooding and power outages, being prepared is no longer optional; it’s an act of care for your family, your neighbors, and your community.
Preparedness doesn’t mean panic. It means having a plan, knowing where to find reliable information, and making thoughtful choices before an emergency hits. For families in Raleigh and the greater Triangle area, local resources like the City of Raleigh’s Ready Raleigh Emergency Guide make it easier to prepare with confidence.
Why Emergency Preparedness Matters
When a storm is approaching, supplies sell out quickly, information can become confusing, and stress levels rise—especially for families with children or pets. A simple emergency plan helps you:
Reduce fear and uncertainty
Respond quickly and safely
Avoid unnecessary risks
Support vulnerable neighbors
Protect children and pets during stressful situations
Preparedness also builds resilience. When households are ready, communities recover faster and emergency responders can focus on the most critical needs.
Step One: Create a Family Emergency Plan
A good emergency plan answers three basic questions: How will we communicate? Where will we go if we must leave? What will we do if we stay home?
According to the Ready Raleigh Guide, every household should:
Identify an out-of-state emergency contact everyone can call if separated
Teach children how and when to call 911
Decide on a family meeting place (inside and outside the home)
Learn how to safely shut off gas, water, and electricity
Make specific plans for pets, including carriers, leashes, and evacuation options
For families with young children, talking through the plan in a calm, age-appropriate way can help reduce fear if a real emergency occurs.
Step Two: Build a Home Emergency Kit
An emergency kit should support your household for at least three days without power. Keep it in a sturdy container and review it annually as your family’s needs change.
Core items recommended by the Ready Raleigh Guide include:
One gallon of water per person, per day
Shelf-stable food (including pet food)
Battery-powered radio and flashlights with extra batteries
First aid kit and necessary medications
Hygiene items and hand wipes
Cash and copies of important documents
Extra clothing and blankets
Special items for infants, children, and pets
During winter storms specifically, additional supplies like extra blankets, warm clothing layers, and ways to safely stay informed during power outages are especially important.
Step Three: Stay Connected to Local, Trusted Information
One of the most important parts of preparedness is knowing where to get accurate, local updates before, during, and after an emergency.
Raleigh residents should bookmark and follow:
Ready Raleigh Emergency Guide (digital and printable formats available)
Wake County emergency alerts via ReadyWake
Local news and weather stations
National Weather Service Raleigh
NOAA Weather Radio for the Triangle area
Make sure Wireless Emergency Alerts (WEA) are enabled on your phone so you receive time-sensitive warnings automatically.
Preparedness Is Also About Community
Emergencies don’t just affect individual households. Neighbors are often the first line of support—especially for older adults, families with young children, or people with mobility or medical needs.
Before a storm:
Check in with neighbors
Share contact information
Offer help securing outdoor items or gathering supplies
After a storm:
Follow up
Share information with first responders if needed
Continue checking on one another
Strong communities save lives.
Free Winter Storm Emergency Checklist
With a record-setting winter storm potentially heading toward central North Carolina, now is the time to prepare. To make it easy, I’ve created a Winter Storm Emergency Preparedness Checklist designed specifically for families with children and pets.
Download the free checklist for a quick, clear reference you can use right now and keep on hand for future storms.
Preparedness doesn’t have to be overwhelming. With a plan, the right resources, and a little advance effort, you can face severe weather with confidence—and help your family feel safe no matter what’s happening outside.
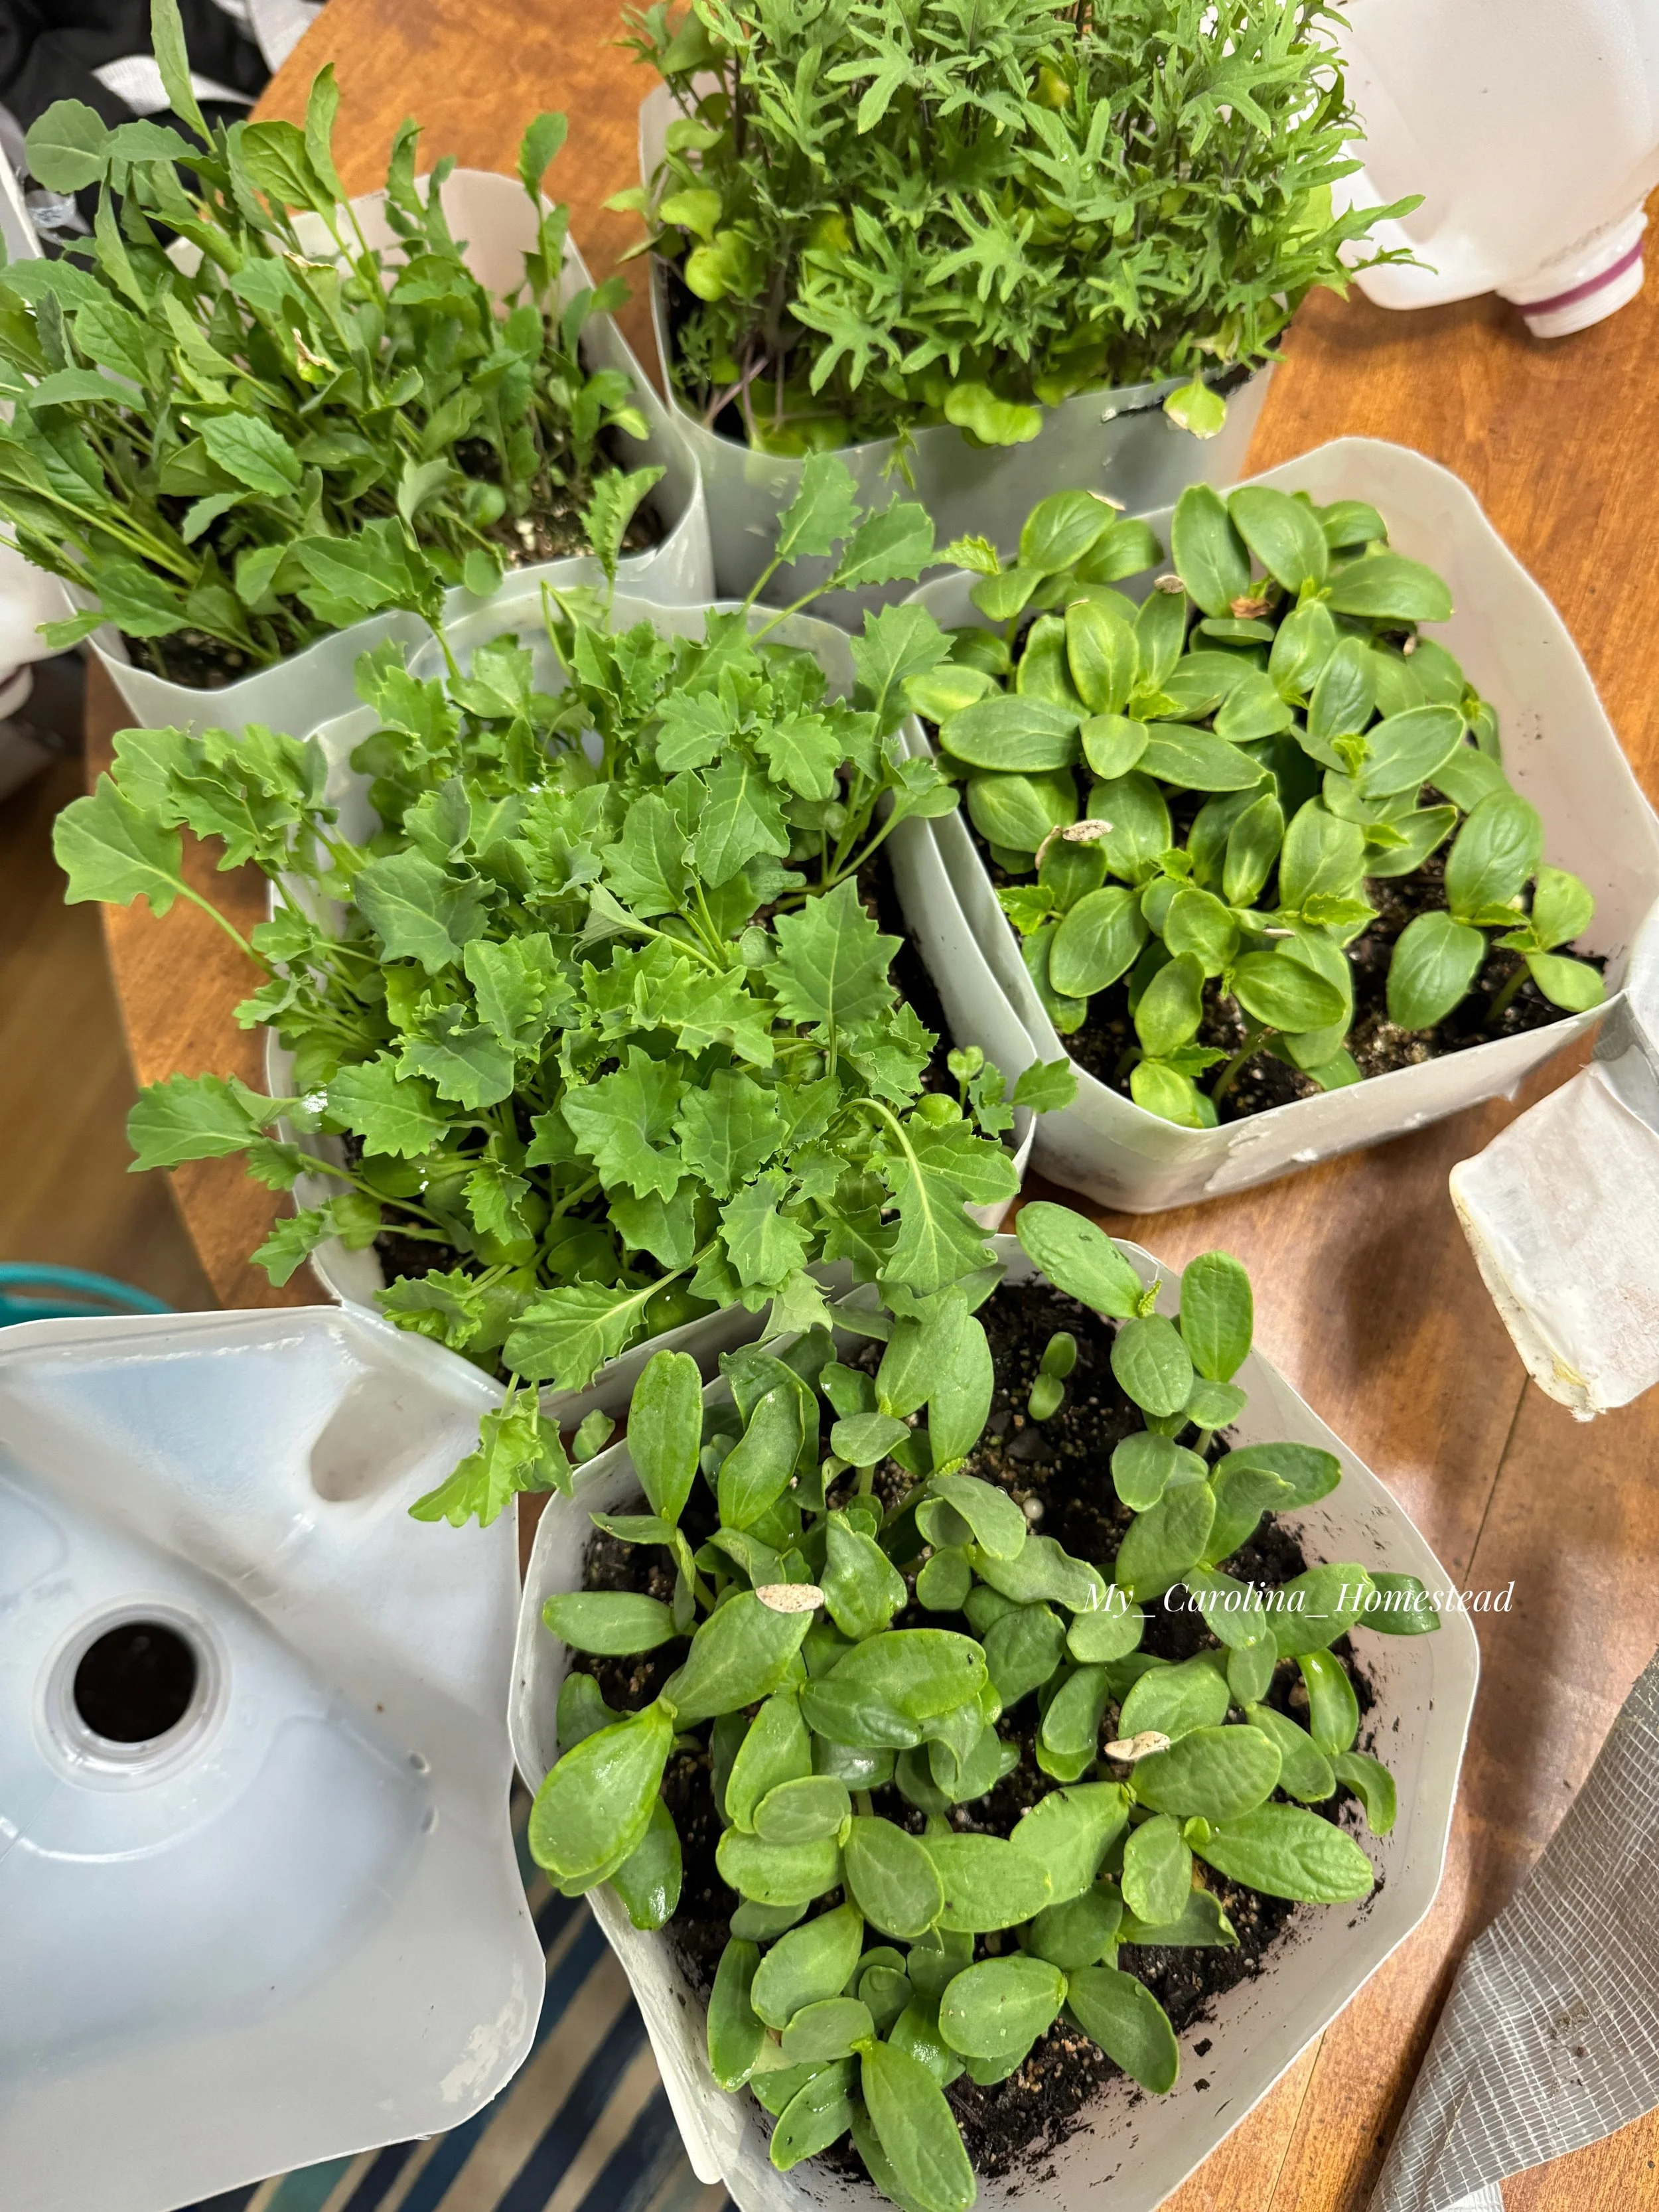
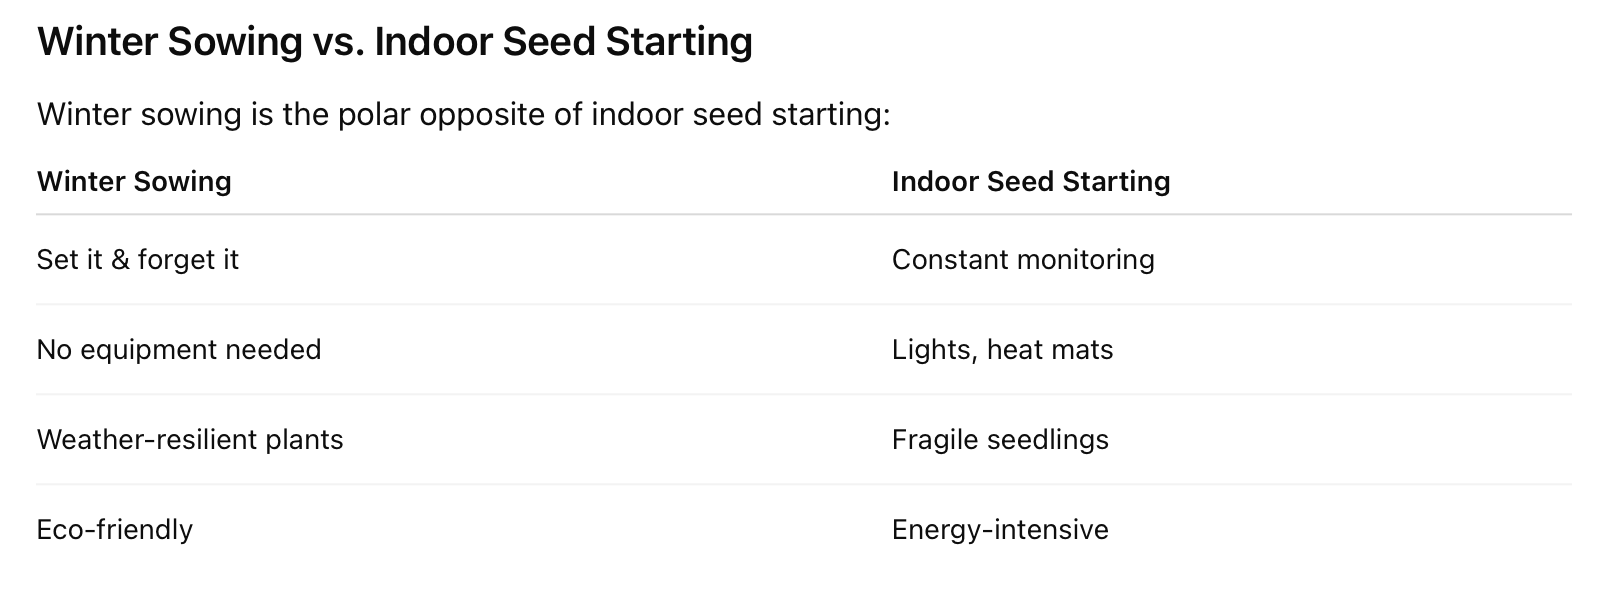
Winter Sowing with Milk Jugs: The Easiest, Cheapest Way to Start Seeds at Home
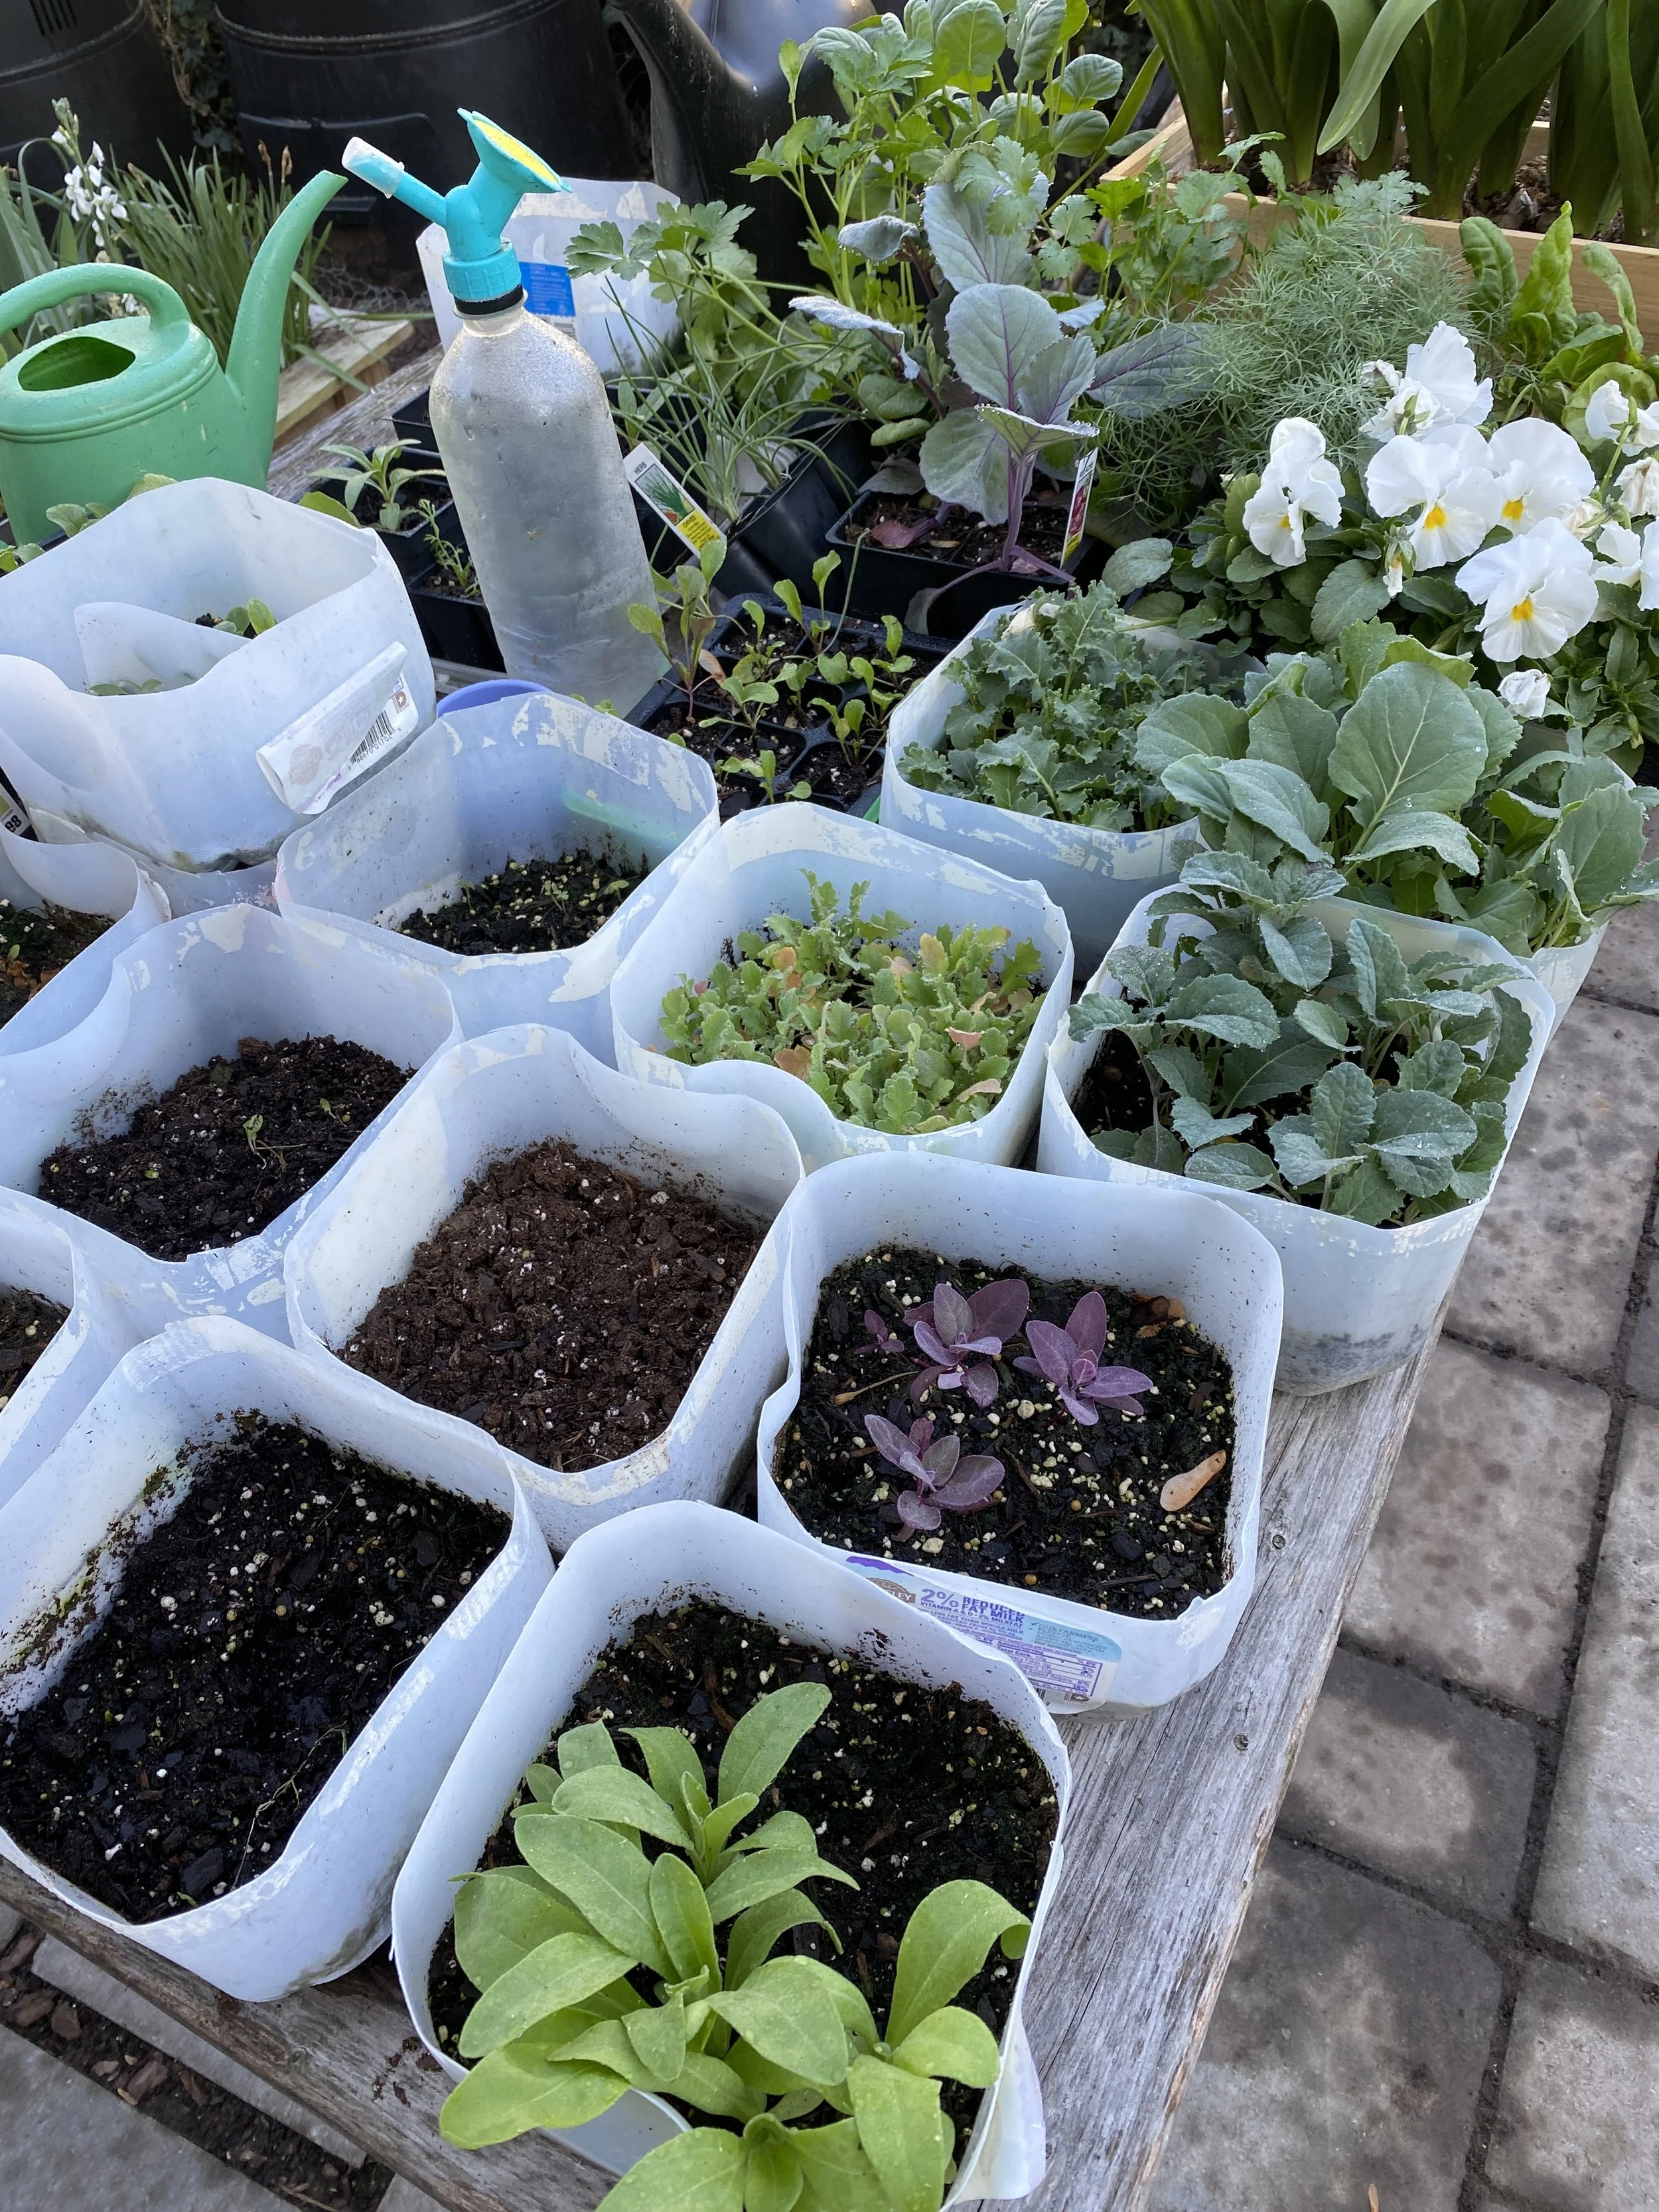
If you’ve ever felt overwhelmed by indoor seed starting—grow lights, heat mats, constant monitoring—winter sowing might just change your gardening life. After using this method for the past four years here at My Carolina Homestead, I can confidently say that winter sowing with gallon milk jugs is one of the simplest, most forgiving, and most eco-friendly ways to grow high-quality plants at home.
It’s truly a set it and mostly forget it approach that works with nature instead of against it, and it consistently produces strong, resilient seedlings ready to thrive in the garden.
What Is Winter Sowing?
Winter sowing is a seed-starting method where seeds are sown outdoors in enclosed containers—most commonly recycled gallon milk jugs—during the winter months. These containers act as mini greenhouses, protecting seeds from extreme conditions while still exposing them to natural temperature fluctuations, rainfall, sunlight, and seasonal cues.
Instead of us trying to perfectly time germination indoors, the seeds decide when they’re ready.
Why Winter Sowing Works So Well
🌱 Seeds Germinate When Conditions Are Right
Each plant species has its own environmental preferences—temperature, moisture, light exposure. Winter sowing allows seeds to respond naturally to these cues. When the timing is right, they sprout. No guesswork required.
🌞 Mini Greenhouses = Stronger Plants
Milk jugs trap warmth and moisture while still allowing airflow and exposure to outdoor conditions. This results in stocky, hardy seedlings that don’t need “hardening off” like indoor-started plants.
💸 High-Quality Plants for Cheap
With winter sowing, you can grow dozens (or hundreds) of plants for the cost of seeds and recycled containers. No grow lights. No heating equipment. No fancy trays.
🌎 Eco-Friendly & Low-Waste
There are many ways to winter sow—plastic bins, takeout containers, trays—but the traditional milk jug method remains one of the most sustainable options. It repurposes materials that would otherwise be discarded and keeps seed starting simple and accessible.
Honoring the Roots of Winter Sowing
The winter sowing method was popularized by Trudi Greissle Davidoff, who developed and shared this approach in the late 1990s. Her work made seed starting more inclusive, affordable, and achievable for everyday gardeners—and many of us are still benefiting from her wisdom decades later.
How Milk Jugs Work as Mini Greenhouses
Each jug is cut open (leaving a hinge), filled with drainage holes, and topped with the cap removed. This design allows:
Rain and snow to enter naturally
Excess moisture to drain out
Air circulation to prevent mold
Sunlight to warm the soil during the day
Inside, the soil stays consistently moist and protected, while temperature fluctuations help signal when it’s time for seeds to grow.
Tips I’ve Learned After 4 Years of Winter Sowing
Here’s what experience has taught me:
💧 Don’t Forget to Check Moisture
Even though winter sowing is low-maintenance, extended dry spells or very low humidity can dry containers out. If there’s no rain or snow for a while, give your jugs a good watering.
🌿 One Jug, Multiple Varieties
If you don’t need a whole tray of one plant, divide a single jug into sections and sow multiple varieties. Just be sure to label clearly.
🏷️ Keep Good Records
Label everything—and then label it again. I recommend:
Plant name
Variety
Date sown
Ink fades. Weather happens. Good records save sanity.
❄️ Trust the Process
This method feels too easy compared to indoor seed starting. That’s because it is. Resist the urge to over-intervene.
Winter Sowing vs. Indoor Seed Starting
(I’ll be sharing a full post soon on indoor seed starting so you can decide what works best for your garden.)
Want to See My Exact Process?
🎥 I’m sharing my full winter sowing setup and step-by-step process on YouTube later this week.
Subscribe to our YouTube channel now so you don’t miss it—and follow along as we turn recycled milk jugs into a thriving spring garden.
Winter sowing reminds us that gardening doesn’t have to be complicated to be successful. Sometimes, the best thing we can do is step back, trust nature, and let the seeds lead the way. 🌱
Teaching Persistence as a Process: Helping Kids Learn How to Keep Going
Nature Sprouts Adventure Club | Outdoor Learning, Grit, & Growth
Nature Sprouts Adventure Club | Outdoor Learning, Grit, & Growth
At Nature Sprouts Adventure Club, we believe persistence isn’t something kids either have or don’t have. It’s something they practice, experience, and grow into—especially when they’re given the time, space, and freedom to explore the world through play.
In a world that increasingly rewards quick answers, instant success, and measurable outcomes, many children are quietly learning that struggle means failure. But what if we flipped that narrative early?
What if we taught children that persistence is a process—one rooted in curiosity, flexibility, and learning—rather than a test of toughness or perfection?
When we do, something powerful happens:
✨ “This is too hard” becomes “I wonder what I could try next?”
Why Persistence Matters More Than Ever
Research consistently shows that persistence, grit, and adaptive problem-solving are stronger predictors of long-term success than early academic performance alone. According to psychologist Angela Duckworth, persistence paired with purpose helps children thrive through challenge—not avoid it.
Young children are actually born persistent. Watch a toddler learn to walk, climb, stack, or pour. They fall. They try again. They adjust. They keep going.
So what changes?
Often, it’s the environments we place them in—ones that prioritize outcomes over exploration, right answers over questions, and speed over process.
At Nature Sprouts, we work intentionally to protect and strengthen children’s natural persistence through outdoor, play-based learning.
Reframing Persistence: From Trait to Process
Instead of treating persistence as a fixed personality trait (“She’s a quitter” or “He’s so determined”), we can teach children that persistence is a cycle they move through again and again:
1. Setting a Goal (Big or Small)
Children set goals constantly—sometimes without realizing it.
“I want to climb that log.”
“I want to build a shelter.”
“I want to carry all these sticks.”
When goals are self-chosen and rooted in curiosity, kids are far more motivated to stick with them. Outdoor environments naturally spark this kind of intrinsic motivation.
Nature Tip:
Let children define their own goals during play. Resist the urge to improve or redirect them.
2. Meeting Challenges
Challenges are not interruptions to learning—they are the learning.
Uneven ground, heavy branches, weather changes, group dynamics, and unexpected outcomes all provide real-world obstacles that require kids to pause, assess, and respond.
Research published in Frontiers in Psychology (2018) shows that children who engage in risky outdoor play develop stronger resilience, emotional regulation, and problem-solving skills.
At Nature Sprouts, we welcome challenge as a teacher.
3. Choosing How to Respond
When children hit a roadblock, they have two powerful options:
Apply effort – keep going, try harder, stay with it
Adapt – change the approach, ask for help, try something new
True persistence lives in the balance between the two.
Endless effort without flexibility leads to frustration.
Flexibility without effort leads to avoidance.
Outdoor play supports both—especially when adults model calm curiosity instead of urgency.
4. Focusing on Learning, Not Just Outcomes
Did the tower fall?
Did the path flood?
Did the plan change?
Great. There’s learning there.
Shifting the focus from “Did it work?” to “What did we learn?” reduces fear of failure and keeps kids engaged longer.
According to a study in Child Development (2016), children praised for effort and strategy—rather than results—show higher persistence and adaptability when tasks become difficult.
How We Support Persistence at Nature Sprouts Adventure Club
Persistence is woven into everything we do—without pressure, prizes, or perfection.
🌿 Child-Led Outdoor Play
Loose parts, natural materials, and open-ended invitations encourage experimentation and revision.
🌿 Gentle Adult Support
We step back, observe, and offer language that supports thinking:
“What are you noticing?”
“Do you want to try that again or try something different?”
“That didn’t work the way you expected—interesting!”
🌿 Playfulness as a Tool
Humor, silliness, and imagination keep children open to new ideas. Neuroscience tells us that play activates creative problem-solving and reduces stress responses in the brain.
Practical Ways to Teach Persistence at Home or School
You don’t need special materials—just a mindset shift.
✔ Frame Goals Around Learning
“I can’t wait to see what you discover while you try.”
✔ Normalize Struggle
“That part is tricky. Tricky things help our brains grow.”
✔ Offer Choice in Response
“Do you want to keep going, or change your plan?”
✔ Reflect Together
After play, ask:
“What worked?”
“What surprised you?”
“What might you try next time?”
Even toddlers benefit from this reflective language.
The Long-Term Gift of Persistence
When children learn that:
challenges are expected
effort and flexibility work together
learning matters more than perfection
They develop confidence that lasts far beyond childhood.
At Nature Sprouts Adventure Club, we’re not raising kids who never struggle—we’re nurturing kids who know how to keep going, with curiosity, kindness, and trust in themselves.
🌱 Those are persistence roots worth growing.
Want to Learn With Us?
Join us for weekly outdoor classes, seasonal sessions, and community play experiences designed to support persistence, empathy, and joyful learning—naturally.

January 2026 Nature Calendar Activities
Jan 1 – New Year Nature Intention Walk
Beginning the year with a nature intention walk invites children to step into January with awareness rather than pressure. Instead of focusing on resolutions, this activity encourages families to walk slowly and notice what draws their child’s attention—birds, sticks, puddles, clouds, or even how their body feels moving outdoors. As you walk, gently invite your child to share one thing they hope to notice, care for, or learn about in nature this year.
This practice nurtures curiosity by helping children tune into their interests and observations. It also supports emotional development by showing kids that intentions can be gentle, flexible, and personal. Walking side by side builds connection and reminds children that growth doesn’t have to be rushed. Nature moves in seasons, and so do we. This quiet beginning sets the tone for a year rooted in presence, care, and wonder.
Jan 2 – Birdseed Shapes
Creating birdseed shapes is a simple way to help children understand empathy in action. During winter, birds and other wildlife have fewer food sources available, and this activity gives children a tangible way to help. As you prepare the birdseed together, talk about why animals need extra support during colder months and how humans share responsibility for the spaces we live in.
This activity nurtures curiosity as children observe which birds visit and what they prefer to eat. It also builds patience and kindness, as kids learn that care often happens quietly and without immediate reward. Feeding birds encourages children to see themselves as helpers and caretakers, reinforcing the idea that even small actions can have meaningful impact on others and the natural world.
Jan 3 – Wolf Moon Walk
The January Full Moon is often called the Wolf Moon, named for the time of year when wolves were historically heard calling during winter nights. Taking a moon walk helps children connect to nature’s rhythms and to cultural stories passed down across generations. Bundle up and step outside together to notice how the moon lights the night differently than the sun.
This activity nurtures curiosity about the sky while helping children feel comfortable in nighttime nature. It also builds emotional awareness, as walking quietly together encourages calm, reflection, and shared wonder. Moon walks remind children that darkness can be peaceful and beautiful, not something to fear. These moments help children develop trust in the natural world and a sense of belonging within it.
Jan 4 – Moon Reflection Drawing
Drawing the moon after observing it the night before encourages children to slow down and reflect. This activity strengthens observation skills, memory, and focus while offering a creative outlet for expression. Encourage your child to draw the moon exactly as they remember it—or however it felt to them.
This process nurtures curiosity by reinforcing that noticing details matters. It also supports emotional development, as drawing allows children to process experiences without needing words. Over time, children begin to recognize patterns in the moon’s shape and brightness, helping them understand that nature changes gradually. These small reflections build patience and appreciation for ongoing cycles in the world around them.
Jan 5 – Winter Color Hunt
Winter often appears colorless at first glance, but a winter color hunt teaches children to look more closely. Invite your child to search for greens in evergreens, silvery grasses, warm browns, or hints of red berries. This activity helps children appreciate subtle beauty and challenges the idea that vibrant color is the only form of beauty.
By noticing quieter tones, children develop curiosity and attention to detail. This practice also nurtures gratitude and empathy, helping children recognize value in things that may seem overlooked or dormant. It’s a powerful reminder that every season—and every being—has worth, even when they aren’t at their brightest.
Jan 6 – Ice Ornament Craft
Making ice ornaments introduces children to science through play. By placing berries or leaves into a dish or muffin tin and freezing them in water, kids witness how temperature changes materials. The anticipation of checking on the ornaments the next morning builds excitement and curiosity.
This activity also teaches impermanence. As the ice melts, children learn that change is natural and expected. This understanding supports emotional flexibility and resilience. Ice bracelets remind children that beauty can be temporary and that experiences are meaningful even when they don’t last.
Jan 7 – Listening Minute
A one-minute listening exercise helps children slow their bodies and sharpen their awareness. Standing still outdoors and focusing on sound strengthens attention and mindfulness. Encourage your child to name each sound they hear—wind, birds, distant cars, crunching leaves.
Listening deeply nurtures curiosity and respect. Children learn that nature communicates quietly and that listening is an important skill in relationships with both people and the environment. This practice also supports emotional regulation, offering children a calm reset during busy winter days.
Jan 8 – Winter Twig Shapes
Arranging twigs into shapes, letters, or patterns combines creativity with natural materials. Children practice problem-solving and spatial reasoning as they experiment with balance and design. This activity shows kids that creativity doesn’t require new supplies—nature provides plenty.
Using found materials also nurtures respect for the environment. Children learn to work with what’s available, reinforcing sustainability and imagination. This playful exploration builds confidence and curiosity while encouraging children to see nature as a partner in creative expression.
Jan 9 – Winter Texture Walk
A texture walk invites children to explore the world through touch. Feeling rough bark, smooth stones, brittle leaves, or soft moss helps children understand their environment through sensory experience. Sensory play supports brain development and strengthens memory.
This activity also nurtures empathy by encouraging gentle interaction with living things. Children learn that how they touch matters. Texture walks remind children that nature can be experienced in many ways, deepening connection and curiosity.
Jan 10 – Last Quarter Moon Watch
Observing the Last Quarter Moon introduces children to the idea of phases and balance. The half-lit moon shows that change doesn’t happen all at once—it unfolds gradually. Watching this phase helps children understand that transitions are natural and necessary.
This lesson supports patience and emotional resilience. By tracking the moon, children learn to expect change and find comfort in cycles. Nature becomes a reassuring constant in a changing world.
Jan 11 – Gratitude Stones
Creating gratitude stones encourages children to reflect on what they appreciate. Painting or decorating stones and placing them in shared spaces turns gratitude into an act of kindness. Children experience the joy of giving without expectation.
This practice nurtures empathy, emotional awareness, and generosity. It also helps children understand that kindness can ripple outward, touching others in unseen ways. Gratitude stones connect emotional learning with tangible action.
Jan 12 – Animal Trail Hunt
Searching for animal tracks or signs teaches children that wildlife is active even when unseen. This activity strengthens observation skills and encourages imaginative thinking as children guess which animals passed through.
It also nurtures empathy by helping children imagine life from another creature’s perspective. Kids learn that animals need shelter, food, and safety—especially in winter. This understanding builds respect and responsibility toward the natural world.
Jan 13 – Winter Leaf Rubbings
Leaf and bark rubbings allow children to explore texture and pattern through art. This hands-on activity builds fine motor skills while encouraging close observation of details often overlooked.
Rubbings also nurture patience and focus. Children learn that slowing down reveals beauty. This blend of art and science strengthens curiosity and appreciation for nature’s design.
Jan 14 – Cloud Shape Stories
Cloud watching encourages imagination and storytelling. As children create stories from cloud shapes, they learn that nature can inspire creativity and that there is no single correct interpretation.
This activity builds confidence, flexible thinking, and emotional expression. It also encourages children to share ideas and listen to others, fostering empathy and communication skills.
Jan 15 – Jupiter Watch
Spotting Jupiter in the night sky expands children’s sense of scale and wonder. Seeing a planet with the naked eye helps kids understand that they are part of a vast universe.
This activity nurtures curiosity about science and space while inspiring awe. Awe helps children develop humility, gratitude, and a sense of connection beyond themselves.
Jan 16 – Thank-You Nature Notes
Writing thank-you notes to nature helps children build emotional connection and respect for the environment. Addressing a tree, bird, or stream encourages children to see nature as something deserving care.
This practice nurtures gratitude, empathy, and mindfulness. Children learn that relationships can exist beyond people and that appreciation strengthens connection.
Jan 17 – Minute of Stillness
Sitting quietly outdoors teaches children that stillness is valuable. Even a brief pause helps regulate emotions and build awareness of the present moment.
This activity supports self-regulation and inner calm. Nature provides a safe, grounding space where children can reconnect with themselves.
Jan 18 – New Moon Night
The New Moon offers an opportunity to embrace darkness as a time for rest and renewal. Standing outside under a moonless sky helps children understand that not all growth is visible.
This lesson nurtures patience, trust, and emotional resilience. Darkness becomes a space for reflection rather than fear.
Jan 19 – MLK Jr. Day: Nature Service
Honoring Dr. Martin Luther King Jr. through service connects justice, community, and care for shared spaces. Picking up litter or caring for a park teaches children that service can be simple and meaningful.
This activity nurtures empathy, responsibility, and cultural understanding. Children learn that caring for the Earth is part of caring for one another.
Jan 20 – Natural Obstacle Walk
A natural obstacle walk invites children to move their bodies in ways that feel playful, empowering, and connected to the land. Whether it’s stepping over logs, weaving between trees, balancing on rocks, or climbing a small hill, these movements help children build confidence in their physical abilities. Outdoor movement also supports emotional regulation—children learn how to assess risk, listen to their bodies, and problem-solve in real time.
This activity nurtures curiosity by encouraging kids to ask questions like, “How can I get across this?” or “What happens if I try it another way?” It also fosters empathy and patience, as children learn to take turns, help one another, and respect different comfort levels. Nature provides a forgiving, flexible space where there’s no “right” way to move—just opportunities to try, adapt, and grow.
Jan 21 – Winter Tree Hug
Inviting children to hug a tree may seem simple, but it creates a powerful sensory and emotional connection to the natural world. Feeling the rough bark, cool surface, or wide trunk helps children understand that trees are living beings, not just background scenery. This physical interaction builds empathy by encouraging kids to see trees as something worthy of care and respect.
Tree hugging also promotes grounding and emotional regulation. The act of wrapping arms around something solid and steady can help children feel calm and secure, especially during winter when routines may feel disrupted. As you hug the tree together, talk about how trees provide shelter, clean air, and homes for animals. These conversations help children recognize interdependence and develop a sense of responsibility toward the Earth.
Jan 22 – Winter Mandalas
Creating winter mandalas using natural materials like sticks, stones, pinecones, and leaves introduces children to patterns, symmetry, and balance found throughout nature and across cultures. This slow, intentional activity encourages focus and patience while allowing creativity to flow freely. There’s no correct outcome—only exploration and expression.
Mandalas also support emotional well-being by offering children a calm, repetitive process that can be deeply soothing. As children place each item thoughtfully, they learn that small actions contribute to something larger and meaningful. This mirrors how individual choices impact our communities and environment. Making mandalas together fosters cooperation, respect for shared space, and appreciation for nature’s quiet beauty.
Jan 23 – Moon & Saturn Watch
Looking up to spot the Moon and Saturn helps children expand their sense of place in the universe. Seeing planets with the naked eye sparks awe and curiosity, reminding kids that learning doesn’t always require tools or screens—sometimes it just requires slowing down and looking up.
This activity nurtures scientific curiosity while also encouraging humility and wonder. Children begin to understand that Earth is part of a much larger system, shared by people across cultures and time. Stargazing together also builds connection and shared meaning, creating space for thoughtful questions and imaginative stories about the night sky.
Jan 24 – Under-the-Rock Discoveries
Gently lifting rocks to observe what lives beneath introduces children to hidden ecosystems often overlooked. This activity teaches respect, care, and responsibility—rocks are lifted slowly and returned carefully so habitats remain undisturbed. Children learn that curiosity and kindness can exist together.
Discovering insects, worms, or soil life nurtures empathy for small creatures and reinforces the idea that every living thing has a role. It also helps children understand cause and effect: our actions impact others. These lessons build environmental awareness while encouraging children to see themselves as thoughtful stewards of the land.
Jan 25 – First Quarter Moon Drawing
Drawing the First Quarter Moon helps children practice close observation and recognize gradual change. By noticing how the moon looks different from week to week, kids learn that growth often happens in stages, not all at once. This understanding supports patience and resilience.
Artistic reflection also gives children a way to process what they see and feel without needing words. Drawing the moon becomes both a scientific observation and an emotional expression. Over time, children begin to see patterns and cycles, strengthening their understanding of nature’s rhythms and their own personal growth.
Jan 26 – Frost Art
Frost art invites children to notice nature’s fleeting beauty. Frost patterns appear briefly and vanish quickly, teaching kids to appreciate moments as they are. Pressing paper into frost or sketching its designs helps children slow down and truly observe.
This activity fosters mindfulness and curiosity while gently introducing the concept of impermanence. Children learn that not everything can be saved or preserved—and that’s okay. Some experiences are meant to be enjoyed in the moment. This lesson supports emotional flexibility and gratitude.
Jan 27 – Nature Kindness Challenge
Picking up litter during a short walk helps children understand that caring for nature is an active choice. This simple kindness act empowers kids by showing them that their actions matter. Even small efforts contribute to healthier shared spaces.
This activity nurtures empathy and responsibility, reinforcing the idea that the Earth is something we care for together. It also connects environmental stewardship with community care, helping children see how kindness extends beyond people to the places we share.
Jan 28 – Winter Scavenger Hunt
A winter scavenger hunt adds purpose and excitement to outdoor exploration. Searching for specific natural items encourages focus, problem-solving, and observation. Children learn to notice details they might otherwise overlook.
This activity nurtures curiosity while promoting collaboration and communication. Scavenger hunts also help children develop confidence as they make discoveries independently. Nature becomes a space of adventure rather than something distant or intimidating.
Jan 29 – Winter Breath Play
Watching breath clouds in cold air introduces children to body awareness and breathing in a playful, accessible way. This activity naturally encourages slower breathing, which helps calm the nervous system.
Children learn that their bodies respond to the environment and that breath can be a tool for comfort and focus. These early mindfulness skills support emotional regulation and self-awareness, helping children feel more connected to themselves and the present moment.
Jan 30 – Constellation Storytime
Sharing stories about constellations connects children to cultures across history who have used the stars to tell stories, navigate journeys, and make sense of the world. This activity blends imagination, science, and cultural appreciation.
Storytelling under the stars nurtures creativity and curiosity while reinforcing that humans everywhere share the same sky. It encourages respect for diverse traditions and helps children feel part of a global and historical community.
Jan 31 – Reflection Walk
A reflection walk invites children to look back on the month and notice what stood out to them. Reflecting together helps children build memory, gratitude, and emotional awareness. It teaches that experiences—not just outcomes—have value.
This practice encourages children to recognize growth in themselves and their relationship with nature. Reflection also supports empathy, as children listen to others’ experiences and perspectives. Ending the month this way reinforces intentional living and appreciation for the journey.
The Winter Solstice & Outdoor Nature Play: Nurturing Wonder, Resilience, and Development in Young Children
Discover how the Winter Solstice supports children’s emotional, physical, and cognitive development through outdoor nature play. Learn simple, meaningful solstice activities for families and caregivers.

The Winter Solstice is one of nature’s most powerful and poetic moments. Occurring around December 21st in the Northern Hemisphere, it marks the shortest day and the longest night of the year. For centuries, humans across cultures have honored this turning point as a time of reflection, rest, and hope for the return of light.
For families, caregivers, and outdoor educators, the Winter Solstice offers something especially meaningful: a developmentally rich opportunity to slow down, tune in, and help children experience seasonal change through outdoor nature play. Rather than avoiding the darker, colder days, the solstice invites us to lean into them—supporting children’s emotional regulation, curiosity, resilience, and connection to the natural world.
This post explores why the Winter Solstice matters for young children, how outdoor play supports healthy development during this season, and simple, accessible ways families can honor the solstice together outdoors.
What Is the Winter Solstice?
The Winter Solstice occurs when the Earth’s axis tilts farthest away from the sun, resulting in the least amount of daylight all year. After this day, the sun slowly begins to return, and daylight increases minute by minute—a subtle but powerful shift.
For children, this concept doesn’t need to be taught with technical language. Instead, it can be experienced through observation:
The sun setting earlier
Longer shadows
Cooler temperatures
Bare trees and dormant gardens
Quieter landscapes and slower rhythms
The solstice is not just about darkness—it’s about transition. It marks the moment when the year begins turning back toward the light.
Why the Winter Solstice Is Meaningful for Children
Young children are natural observers of patterns. They notice when routines change, when days feel different, and when nature shifts. The Winter Solstice provides a concrete, sensory-rich way to explore big ideas such as:
Cycles and seasons
Change and impermanence
Rest and renewal
Light and darkness
Patience and hope
When children are invited to experience the solstice through outdoor play rather than abstract explanations, learning becomes embodied and meaningful.
How Outdoor Nature Play Supports Development During the Solstice Season
1. Emotional Regulation & Mental Health
Winter can bring shorter days, disrupted routines, and less sunlight—all of which affect children’s moods just as they do adults’. Outdoor play helps regulate emotions by:
Increasing exposure to natural light
Supporting circadian rhythms
Reducing stress hormones
Offering space for big feelings
Nature provides a calming, grounding environment where children can process emotions without pressure or overstimulation.
2. Physical Development & Resilience
Cold-weather outdoor play builds strength, coordination, and confidence. Navigating uneven ground, layering clothing, and adapting to changing weather all support:
Gross motor development
Balance and spatial awareness
Body autonomy
Resilience and adaptability
Children learn that discomfort doesn’t mean danger—and that they are capable of meeting challenges.
3. Cognitive Growth & Scientific Thinking
The Winter Solstice naturally introduces early science concepts:
Cause and effect (Why are days shorter?)
Observation and comparison
Time and sequencing
Weather patterns
Outdoor play during this season encourages curiosity and inquiry without worksheets or screens.
4. Sensory Integration
Winter landscapes offer unique sensory experiences:
Crunchy frost or frozen ground
Cold air on cheeks
Quiet soundscapes
Low-angle sunlight
These experiences help children integrate sensory input in a balanced, regulated way—especially important for toddlers and preschoolers.
5. Connection, Culture, and Belonging
Celebrating the solstice helps children understand that humans have always looked to nature for guidance. Sharing simple seasonal rituals builds:
A sense of belonging
Cultural awareness
Family traditions
Emotional security
Children don’t need elaborate ceremonies—just meaningful moments.
Why Learning About the Solstice Through Play Matters
When children learn about the solstice through outdoor play, they:
Experience learning as joyful, not performative
Build trust in their own observations
Develop respect for nature’s rhythms
Learn that rest is productive
Understand that darkness is part of growth
These lessons lay the foundation for lifelong emotional intelligence, environmental stewardship, and self-awareness.
Simple Ways to Honor the Winter Solstice Through Outdoor Play
These activities are intentionally low-prep, flexible, and accessible for families, caregivers, and early childhood programs.
1. Solstice Nature Walk
Take a slow walk at sunrise or sunset. Invite children to notice:
How long shadows are
Where the sun sits in the sky
What plants look like in winter
Ask open-ended questions like:
“What do you notice today?”
“How does winter feel different?”
No answers required—just noticing.
2. Lantern Walk or Light Walk
Create simple lanterns using jars, LED candles, or paper bags. Take an early evening walk to symbolize carrying light through darkness.
This supports:
Emotional regulation
Mindfulness
A sense of ritual and safety
3. Shadow Play
Use the low winter sun to explore shadows:
Trace shadows on the ground
Compare shadow lengths
Play with body shapes
This builds early math, science, and body awareness.
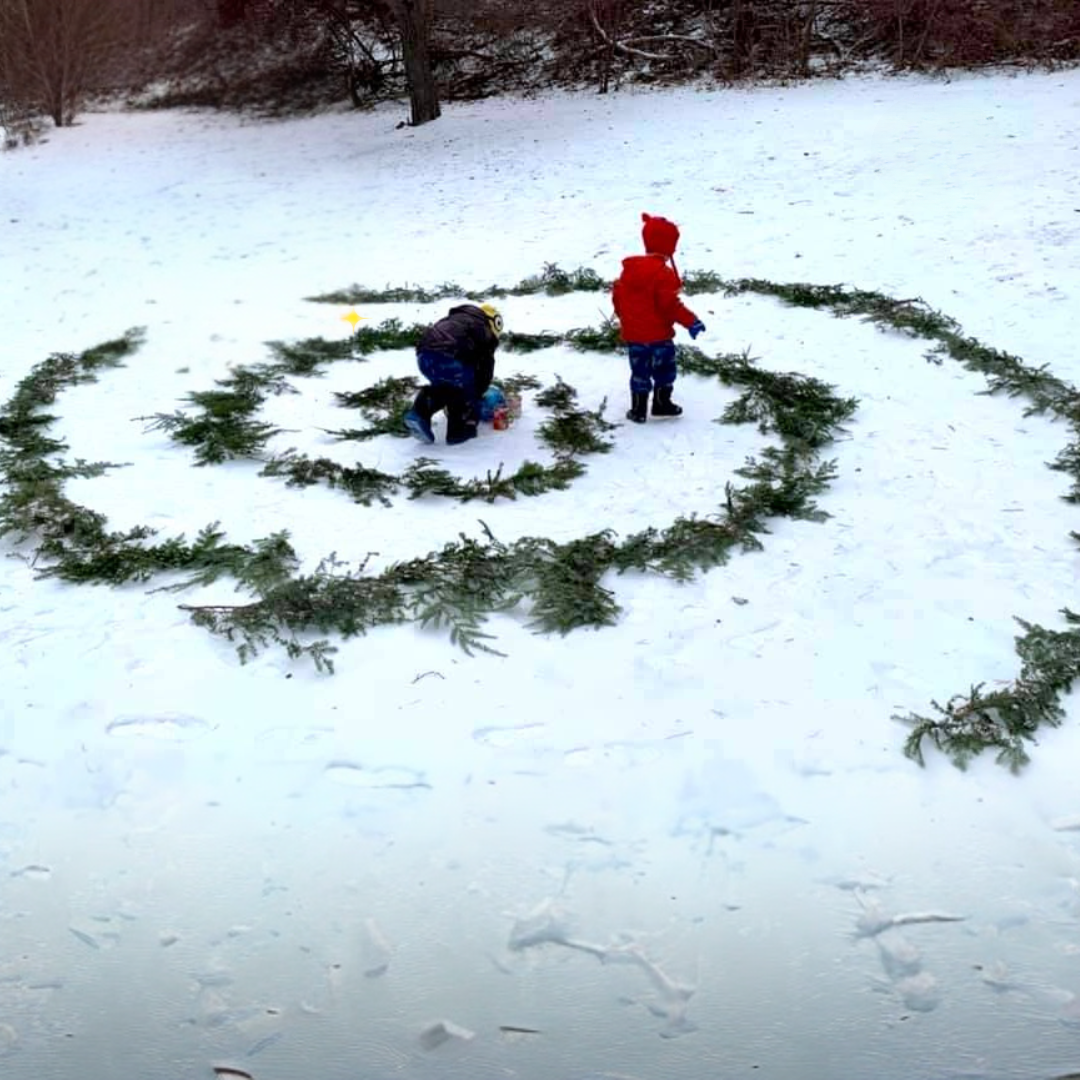
4. Nature Offerings or Mandalas
Invite children to gather natural materials and arrange them in a circle or pattern outdoors. Talk about:
Letting go
Thanking the earth
Honoring the season
This supports creativity, mindfulness, and fine motor skills.
5. Winter Sit Spot
Choose a quiet outdoor spot and visit it regularly throughout winter. Sit, listen, and observe for just a few minutes.
This practice builds:
Focus and attention
Emotional regulation
Connection to place
6. Fire & Warmth Exploration (Safely)
If appropriate, observe a small fire pit or light candles outdoors. Talk about warmth, light, and safety.
Alternatively, explore warmth through:
Hot tea in thermoses
Warm stones in pockets
Sun-warmed spaces
7. Storytelling Outdoors
Share simple stories about the sun returning, animals resting, or the earth sleeping. Invite children to create their own stories.
Storytelling supports language development, imagination, and emotional expression.
8. Seasonal Art with Natural Materials
Use sticks, mud, ice, leaves, or snow to create temporary outdoor art. Emphasize process over product.
Letting the Solstice Be Simple
Honoring the Winter Solstice does not require perfection, Pinterest-worthy crafts, or long explanations. Children benefit most from:
Presence over performance
Consistency over complexity
Experience over explanation
Outdoor play during the solstice teaches children something deeply countercultural: that slowing down is valuable, darkness is not something to fear, and rest is part of growth.
A Final Reflection
The Winter Solstice reminds us that even in the darkest season, change is happening beneath the surface. When we invite children to experience this truth through outdoor nature play, we give them tools for resilience, empathy, and lifelong learning.
By honoring the solstice outdoors—with curiosity, warmth, and wonder—we help children grow not just academically, but emotionally, socially, and spiritually.
And perhaps, in doing so, we grow alongside them.
What to join in on our Winter Solstice Hike to celebrate this new season? You can sign up to join us here!
Why Outdoor Play is Essential for Your Child’s Health and Development—Even in Winter

As the temperature drops and winter settles in, many parents and caregivers are tempted to retreat indoors, believing that outdoor play is best left for warmer months. But did you know that outdoor play during the winter is just as essential for your child's health and development? In fact, bundling up and heading outside can provide unique benefits that indoor play simply can't replicate.
In this post, we’ll explore why outdoor play is crucial for children aged 1.5 to 8, the developmental milestones it supports, and how you can safely and comfortably encourage your little ones to enjoy nature year-round. If you're in the Triangle area, you'll also find local resources and tips tailored to our beautiful region.
The Benefits of Outdoor Play—Even in Cold Weather
1. Physical Health and Immune System Boost
Spending time outdoors in the fresh air boosts your child's immune system, making them more resilient to seasonal illnesses. Cold weather play also encourages physical activity, which:
Improves cardiovascular health.
Enhances gross motor skills like running, jumping, and climbing.
Promotes better sleep patterns, as physical exertion helps regulate sleep cycles.
A study by Harvard Health even shows that children who play outside regularly experience fewer colds and flu during the winter.
2. Mental Health and Emotional Well-being
Nature has a calming effect on children and helps reduce anxiety and stress. Winter’s quieter, less crowded outdoor spaces provide a peaceful environment for children to:
Build emotional resilience.
Develop mindfulness and an appreciation for nature’s seasonal changes.
Experience sensory play with different textures like crunchy leaves, snow, or icy puddles.
The lack of sunlight during winter can contribute to mood dips, but regular outdoor exposure increases natural light intake, which helps regulate mood and energy levels.
3. Cognitive Development and Problem-Solving Skills
Outdoor play in winter stimulates critical thinking and problem-solving in ways indoor play can’t. Whether it’s figuring out how to navigate icy terrain, building a fort with limited resources, or observing how animals adapt to the cold, children are constantly learning.
STEM Skills: Outdoor exploration introduces concepts of science, technology, engineering, and math.
Creativity: Open-ended play fosters imagination as children invent games, build structures, or create art with natural materials.
4. Social Skills and Empathy
Playing outside with peers or caregivers enhances social interactions and fosters empathy. Children learn to:
Cooperate and collaborate during group activities.
Take turns and practice patience.
Empathize with others, including animals and plants adapting to winter conditions.
Overcoming Common Barriers to Outdoor Play in Winter
1. “It’s Too Cold!”
Layering is key! Dress your child in moisture-wicking base layers, insulating mid-layers, and waterproof outerwear. Don’t forget warm hats, gloves, and thick socks. The rule of thumb is to dress your child in one more layer than you would wear.
2. “It’s Hard to Find Activities”
Here are some fun, winter-specific outdoor activities for toddlers and preschoolers:
Nature Scavenger Hunt: Search for winter birds, animal tracks, or different types of leaves.
Snow Art: Use food coloring and water in spray bottles to “paint” the snow.
Obstacle Courses: Set up a winter obstacle course using natural elements like logs, rocks, and snow mounds.
3. “It’s Not Safe”
Safety is a valid concern, but with proper preparation, outdoor play can be safe and enjoyable:
Always supervise young children.
Avoid icy areas where slipping is a risk.
Keep outdoor sessions short if temperatures drop too low, and ensure kids are warm and dry.
Local Resources for Outdoor Play in the Triangle Area
If you’re in Raleigh, Durham, or Chapel Hill, you’re in luck! The Triangle area is full of parks, trails, and nature preserves perfect for winter exploration. Here are a few favorites:
Eno River State Park: Great for short winter hikes and nature observation.
Durham’s West Point on the Eno: Offers open spaces for free play and exploration.
NC Botanical Garden in Chapel Hill: Even in winter, it’s a beautiful spot for guided nature walks.
William B. Umstead Park: Where we host most of our Monthly family friendly hikes in Raleigh
Join Our Nature-Based Winter Program
If you’re looking for structured outdoor play that nurtures creativity, empathy, and problem-solving, consider enrolling in our Nature-Inspired Play-Based Caregiver and Me Program.
We meet once a week during the winter season and explore the beauty of nature in the Triangle area. Our sessions are designed to:
Foster your child’s physical, cognitive, and emotional development.
Provide opportunities for social interaction in a small, supportive group.
Help caregivers connect with their children and other like-minded families.
Ready to explore? Enroll now and experience the magic of outdoor play this winter!
Conclusion
Don’t let the colder months keep you and your child indoors. With the right preparation, outdoor play in winter can be a fun, enriching experience that supports your child’s health and development. Bundle up, step outside, and watch your little one thrive!

Forest Putty: Our Favorite Homemade, All-Natural Playdough for Little Explorers

At Nature Sprouts Adventure Club, we believe that some of the most powerful learning tools are also the simplest. Enter Forest Putty—our beloved homemade, all-natural playdough that little explorers return to again and again.
Forest Putty is a budget-friendly, taste-safe, long-lasting alternative to traditional playdough, designed for open-ended outdoor play and sensory exploration. We use it during our sessions as a creative companion to nature treasures—and as a gentle substitute for our other (equally loved) sensory staple: mud.
For children who experience sensory aversions to wet or gritty textures, Forest Putty offers a comforting, moldable middle ground that still invites curiosity, creativity, and connection to nature.
Best of all? Caregivers can make it at home in about 10 minutes, using simple pantry ingredients.
What Is Forest Putty?
Forest Putty is our Nature Sprouts version of homemade playdough—intentionally made to be taken outside.
Unlike store-bought doughs that are brightly colored, artificially scented, or quick to dry out, Forest Putty is:
Soft and sturdy
Neutral in color
Naturally scented (optional)
Easy to repair, refresh, and store
We invite children to blend Forest Putty with:
Leaves
Sticks
Seeds
Stones
Pinecones
Flower petals
The result? Tiny sculptures, nature faces, pretend food, fairy houses, animal tracks, and endless imaginative creations.
Why We Love Forest Putty at Nature Sprouts
Forest Putty supports whole-child development in a way that feels playful, calm, and accessible for young children (especially ages 1–5).
🌱 Developmental Benefits of Forest Putty
Fine Motor Skill Development
Rolling, pinching, poking, flattening, and squeezing strengthens little hands
Builds foundational skills needed for writing, cutting, and self-care tasks
Sensory Exploration
Smooth, predictable texture supports children with sensory sensitivities
Can be warmed by hands or cooled outdoors for varied experiences
Creative & Imaginative Play
Open-ended material with no “right way” to play
Encourages storytelling, pretend play, and problem-solving
Emotional Regulation
Rhythmic kneading and molding can feel grounding and calming
Supports focus, patience, and self-expression
Nature Connection
Encourages children to slow down, observe, and use natural materials intentionally
A Budget-Friendly, All-Natural Choice for Families
Forest Putty is:
Inexpensive to make (using pantry staples)
All natural
Taste-safe for curious toddlers (not a snack, but worry-reducing!)
Long-lasting when stored properly
Customizable for scent, color, and seasonal themes
It also holds up beautifully over time—perfect for classrooms, homeschool families, and caregiver-and-me programs like ours.
Our Go-To Forest Putty Recipe (Classic Version)
Ingredients
2 cups flour
1 cup salt
4 teaspoons cream of tartar
4 tablespoons oil (vegetable or avocado oil works well)
2 cups cold water
Optional natural color (turmeric, beet juice, spirulina)
Optional natural scent (cinnamon, vanilla, lemon juice, dried herbs)
Directions
Mix all dry ingredients in a pot.
Add wet ingredients and stir well.
Cook over medium-low heat, stirring continuously with a wooden spoon.
Keep stirring—yes, even when it feels too wet!
The dough will begin to stick to itself and form a ball.
Remove from heat, knead gently, and allow to cool.
Once cool, store in an airtight container or zip-top bag.
Storage Tip:
Forest Putty lasts weeks (sometimes months!) when stored in an airtight container. For extra longevity, store in the refrigerator between uses.
Quick Forest Putty Hack (No Stove Option)
Short on time?
You can also:
Boil water and let it cool to about 120°F
Slowly add it to the dry ingredients using a stand mixer or hand mixer
Mix until a dough forms
It’s quick, efficient, and works like a charm.
Gluten-Free Forest Putty Recipe
We love that Forest Putty can be adapted for gluten-free families, making it more inclusive and accessible.
Ingredients
½ cup rice flour
½ cup salt
½ cup cornstarch
2 teaspoons cream of tartar
1 teaspoon cooking oil
1 cup water (colored if desired)
Directions
Mix cornstarch and water in a pot.
Combine all remaining dry ingredients separately.
Add oil to the wet mixture.
Combine everything and cook over low heat for about 3 minutes.
Stir until a ball forms, knead, and let cool.
How We Use Forest Putty in Our Nature Sprouts Sessions
During our classes, Forest Putty often appears alongside a simple invitation:
“What could you create with this today?”
Sometimes we pair it with a story.
Sometimes we reflect while little hands stay busy.
Sometimes it becomes a peaceful closing activity after big body play.
It’s also a favorite alternative for children who aren’t quite ready for full-on mud play—allowing everyone to participate comfortably and confidently.
A Little Extra Magic ✨
When gifting Forest Putty or sending it home with families, we love adding a note that reads:
“Dear Explorers,
Enjoy using this Forest Putty to play, imagine, and create.
Love,
Your Friends, the Forest Fairies”
Simple touches like this help children feel connected to the magic of play long after class ends.
Try Forest Putty at Home
Forest Putty is proof that meaningful play doesn’t need to be complicated or expensive. With just a few ingredients and a little intention, you can create a tool that supports:
Motor skills
Sensory development
Creativity
Emotional regulation
Connection to nature
We encourage families to experiment with their own seasonal variations—and most of all, to play together.
As always, keep exploring, keep creating, and keep getting those little hands busy outdoors 🌿

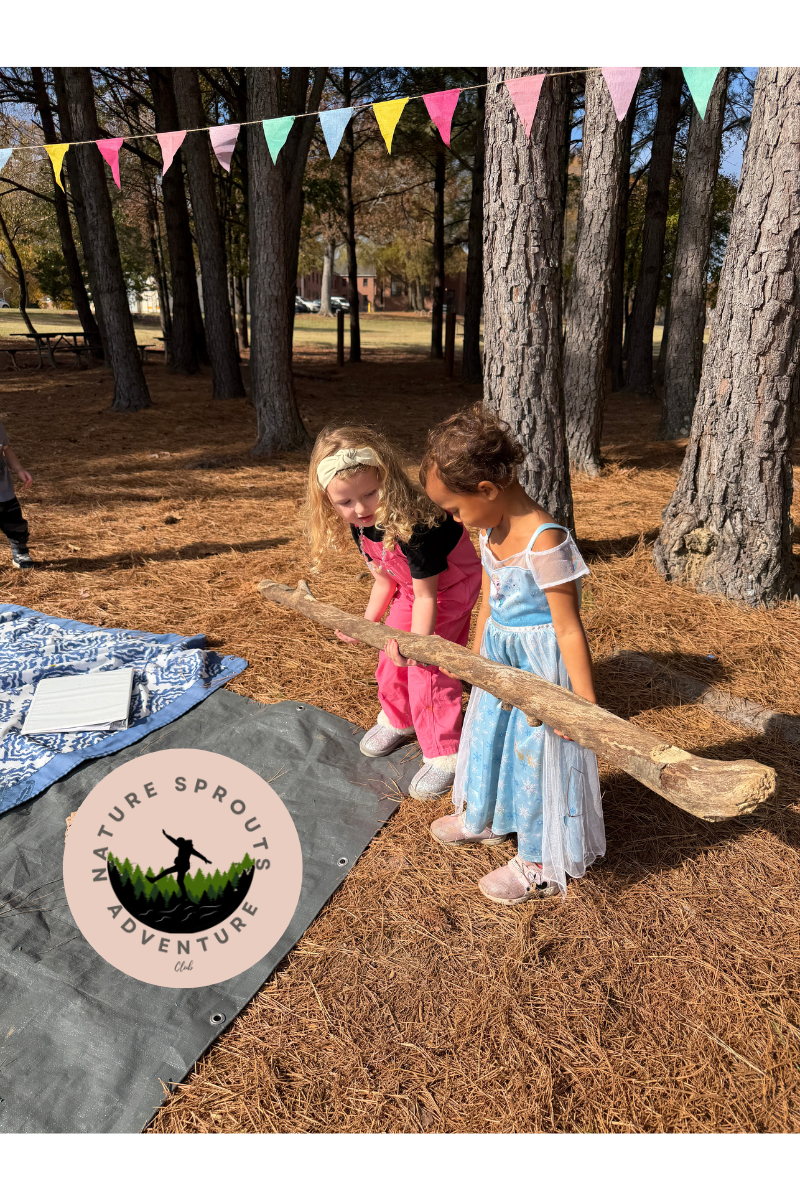
Nature Sprouts Adventure Club Tea Time Recipe: A Simple Ritual for Connection, Reflection, and Little Hands
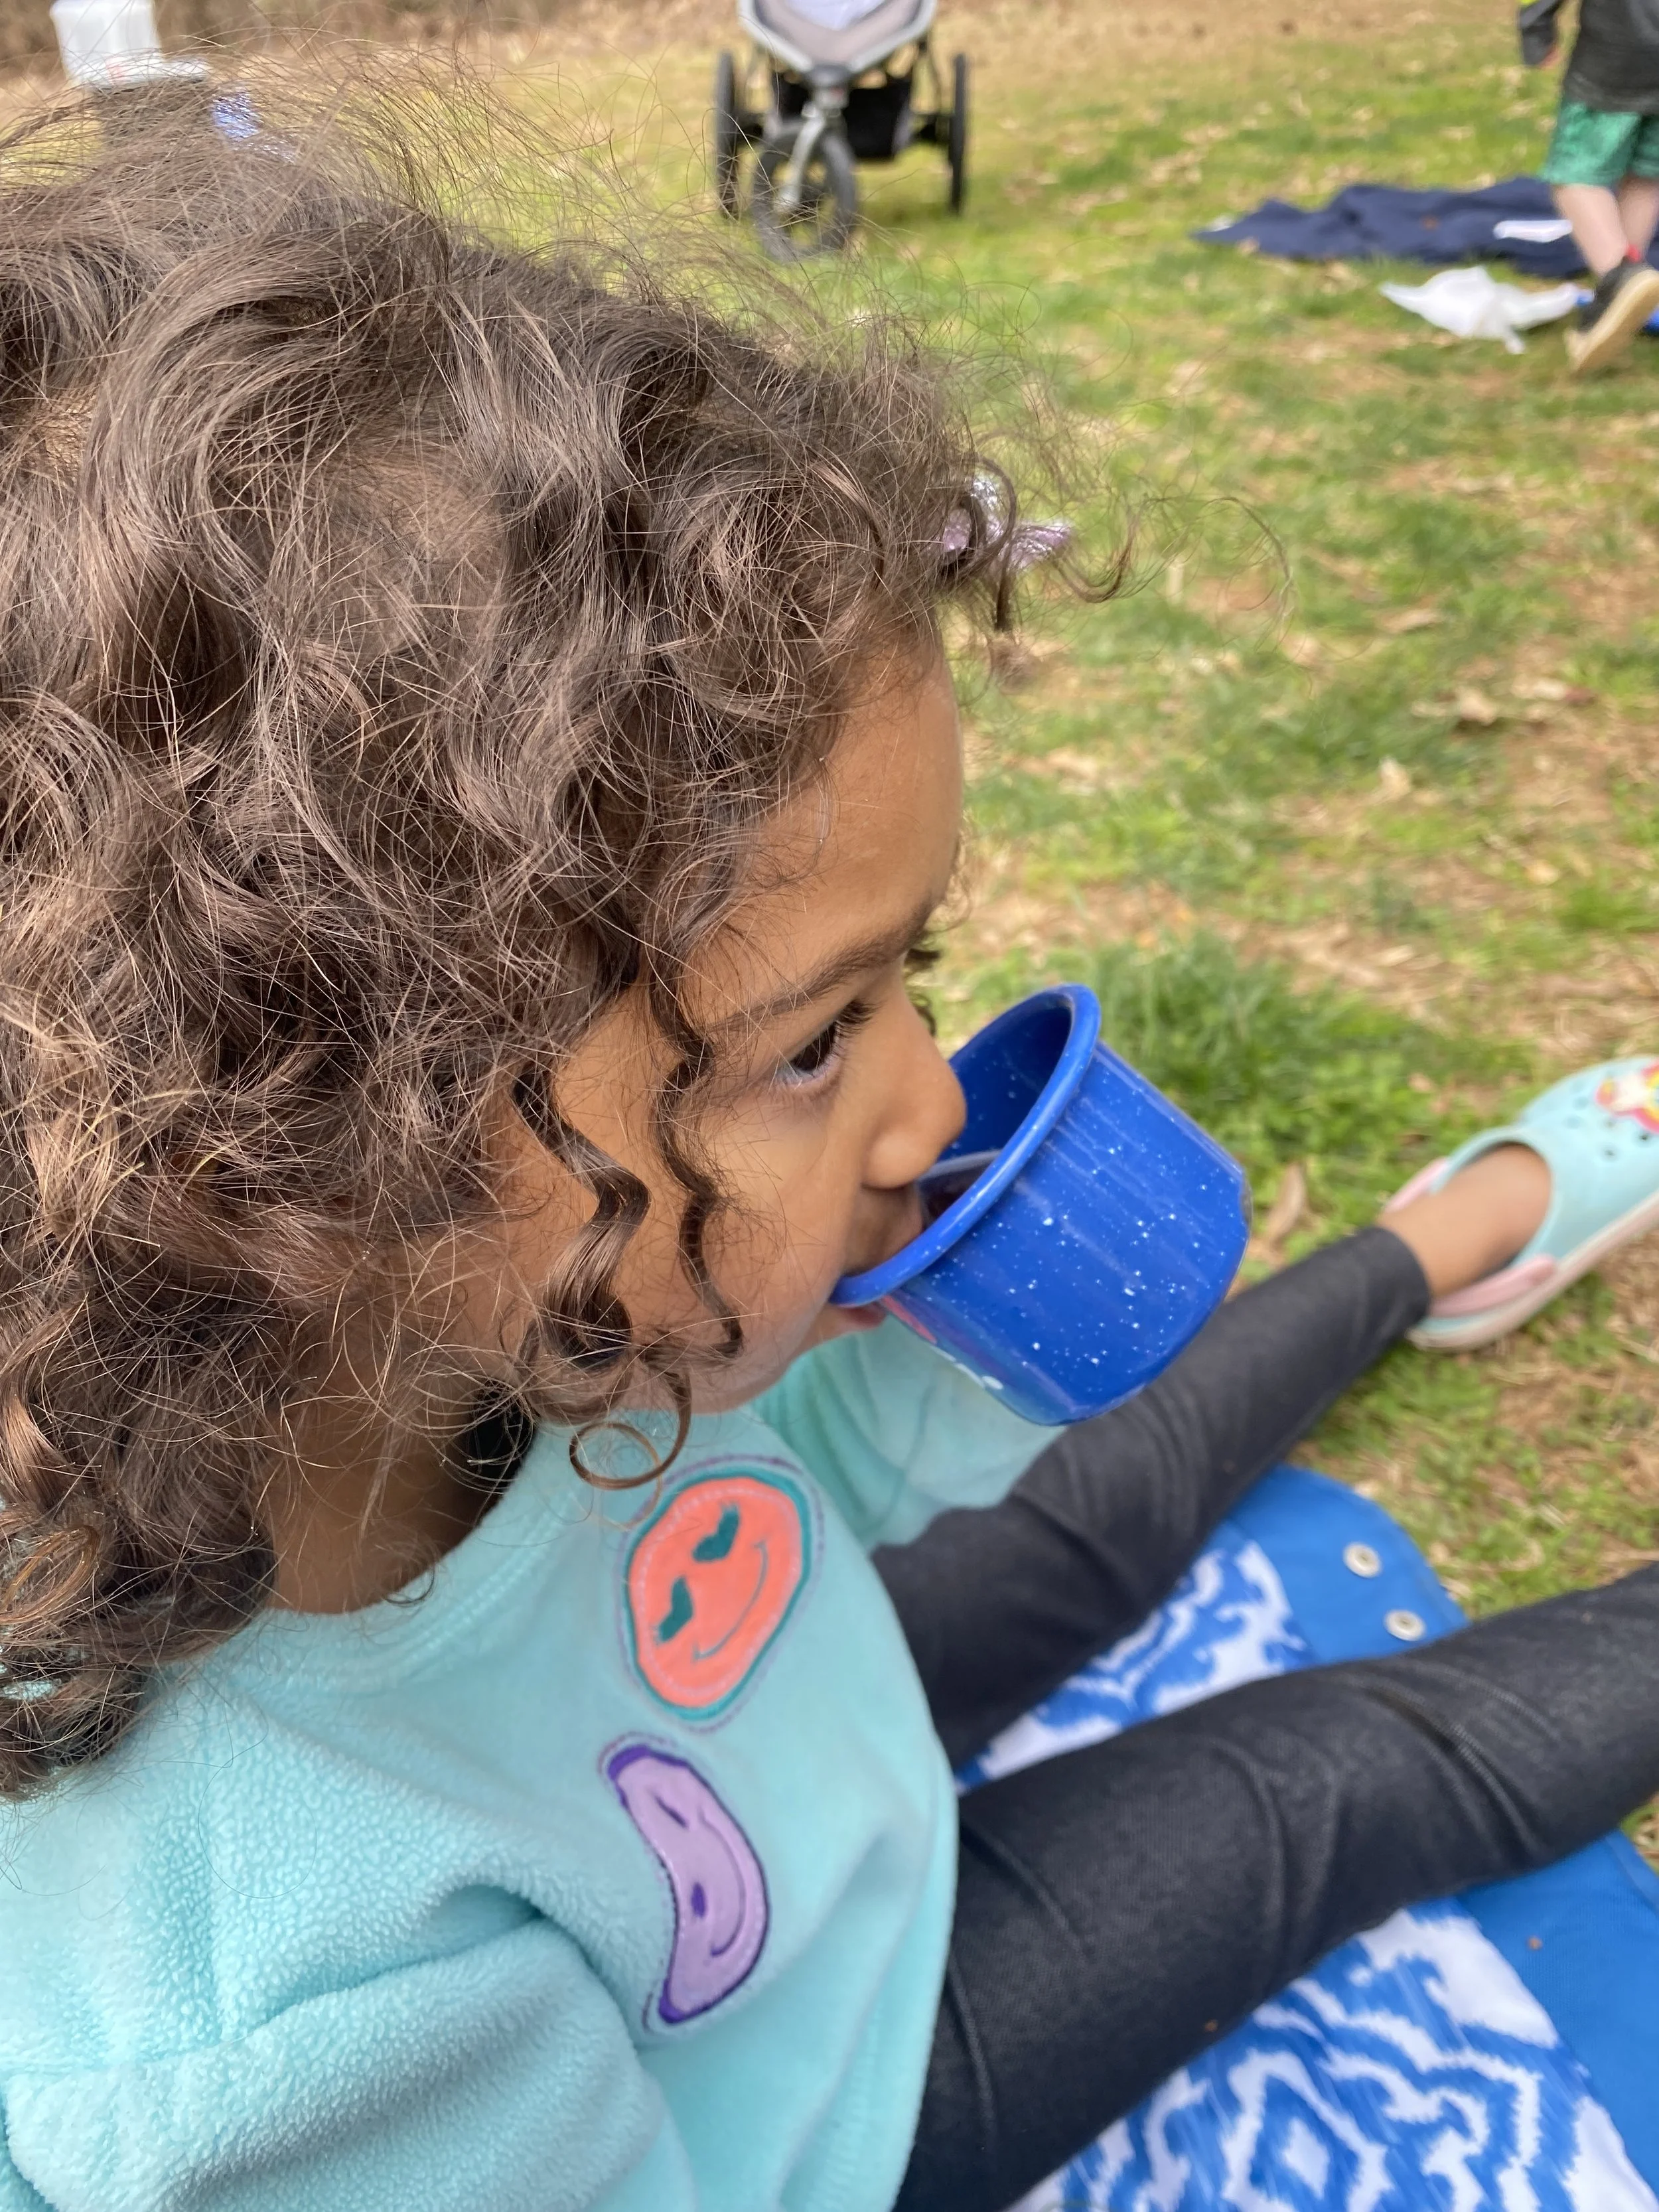
At Nature Sprouts Adventure Club, tea time is more than just a warm drink — it’s a ritual.
Sometimes it happens at the very end of our adventure, other times right at the beginning. We gather together, holding our signature 4 oz camping stoneware cups, perfectly sized for little hands, gently warming fingers that have spent the morning exploring leaves, mud, sticks, and stories.
Tea time is our pause.
It’s when we sit in a circle, reflect on how we played, talk about what we noticed, or curl up together to read our session’s accompanying book. It’s where connection happens — between caregiver and child, between friends, and between little explorers and the natural world around them.
And while the recipe changes with the seasons, the heart and intention behind it always stays the same.
Why Tea Time Matters for Little Explorers
In a fast-moving world, children benefit deeply from predictable, grounding rituals. Tea time offers:
A calm transition between play and departure
A sensory experience (warmth, smell, taste)
Language development through reflection and storytelling
Social-emotional learning through shared conversation
A sense of belonging and routine
For young children, these moments of stillness are just as important as active play.
Our Beloved Nature Sprouts Tea Time Recipe
This recipe is intentionally simple, flexible, and easy to recreate at home. It’s always a favorite with our little explorers.
🌿 Nature Sprouts Tea Time Recipe
Ingredients:
2 quarts water
English Breakfast tea bags
Juice from 1 fresh orange (about a generous squeeze)
~¼ cup agave
(Sweetener rotates seasonally — agave, honey, infused sugar, or syrup)
Instructions:
Bring 2 quarts of water to a boil in a pot.
Remove from heat and steep English Breakfast tea bags for several minutes.
Add a fresh squeeze of orange juice.
Stir in about ¼ cup of agave (adjust to taste).
Let cool slightly before serving in small cups.
✨ Serve warm, not hot — always test before offering to little ones.
This tea is lightly sweet, citrus-bright, and comforting — a combination that children consistently love.
Make It Your Own at Home
One of the most beautiful parts of this ritual is how adaptable it is.
We encourage families to:
Try different teas (black, green, rooibos, or herbal)
Swap sweeteners based on season or preference
Add gentle spices like cinnamon or ginger (for older children)
Create their own “tea time” reflection ritual at home
Tea time doesn’t need to be fancy — it just needs intention.
Is Tea Safe for Young Children?
When chosen thoughtfully, tea can be a gentle and beneficial introduction for young children — especially herbal teas.
Research-Backed Benefits of Tea for Children
Peer-reviewed research suggests that certain teas can offer benefits when consumed in age-appropriate amounts:
Hydration: Herbal teas can support fluid intake, especially for children who resist plain water.
Digestive support: Chamomile and fennel teas have been shown to ease mild gastrointestinal discomfort in children.
Antioxidants: Teas contain polyphenols that help support cellular health.
Calming effects: Chamomile has demonstrated mild anxiolytic (calming) properties in pediatric populations.
Studies published in journals such as Phytotherapy Research, Journal of Pediatric Gastroenterology and Nutrition, and Nutrients highlight the safe use of mild herbal teas in children when caffeine-free and appropriately diluted.
Important Notes for Parents:
Avoid high-caffeine teas for young children
Choose organic, high-quality tea sources
Serve diluted and in small quantities
Always consult your pediatrician if unsure
At Nature Sprouts, tea time is about warmth, connection, and gentle nourishment, not stimulation.
A Ritual That Grows With Your Child
As seasons change, our tea changes.
As children grow, conversations deepen.
But the ritual remains.
Tea time reminds us that slowing down is part of learning — and that some of the most meaningful moments happen when we simply sit together and reflect.
We hope you’ll try this tea at home, create your own version, and build a ritual that nourishes both hearts and hands.
☕🌿

Seasons of Wonder: A Reflection on Our Fall Wellness Season

As the final leaves drift quietly to the ground and autumn begins its soft fade into winter, we pause to reflect on one of our most beautiful, joy-filled seasons yet. This fall, our Nature Sprouts Adventure Club families gathered each week under open skies, exploring, imagining, creating, and learning in the most natural classroom there is—the great outdoors.
Every session brought a new opportunity for connection.
Connection to nature.
Connection to community.
And connection to ourselves.
🌿 Rediscovering the Magic Beneath Our Feet
We began our season with Hello Earth!, grounding ourselves in mud, stones, and sensory play. Little explorers squished soil between their fingers, washed rocks with intention, and rediscovered the deep calm that comes from feeling rooted. Caregivers learned right alongside them that grounding practices—literally touching the earth—can support emotional regulation, confidence, and well-being.
🐿️ Playing Like Creatures of the Fall
As the season unfolded, we moved like migrating birds, cached treasures like imaginative squirrels, and learned how to navigate risky play using sticks—one of nature’s most versatile play tools of all. Through these playful provocations, children built balance, coordination, self-regulation, and resilience, while caregivers discovered how powerful it is to join in, model curiosity, and say “yes” to playful living.
✨ Embracing Mistakes & Celebrating Change
One of our standout moments was “Marvelous Mistakes,” where spilled paint, drips, and creative surprises became opportunities for growth rather than frustration. Nature teaches us over and over again that change is not only normal—it’s beautiful. Watching families lean into this lesson with joy was one of the highlights of our fall.
And of course, the Lantern-Making session filled our circle with warmth and anticipation. Crafting our own lanterns reminded us that light and hope are things we can create with our own hands, even as the days get shorter.
🍽️ A Final Feast of Gratitude
We closed our season with a cozy Fall Feast—a celebration of imaginary cooking, gratitude for our featured creatures, and appreciation for everything nature offers us. Children served pinecone “pastries,” stirred stick “soups,” and lovingly created meals for the critters who share our outdoor spaces. This symbolic gesture helped express what fall is all about: giving thanks, slowing down, and acknowledging the gifts all around us.
💛 What Our Explorers Learned This Season
This fall wasn’t just a series of classes—it was a journey of developmental growth. Through nature play, children strengthened:
Motor skills through climbing, carrying, painting, flying, and building
Emotional resilience through risk-taking, mistakes, and seasonal change
Empathy and connection with the natural world
Curiosity and creativity through open-ended play
Mindfulness and focus through sensory exploration
Confidence by leading their own discoveries and following their interests
Every leaf they examined, every stick they balanced, every moment of wonder helped them become braver, steadier, and more connected to the world around them.
🌱 A Community That Grew With the Season
One of the most beautiful aspects of this fall has been watching our community of caregivers bloom alongside the children. Every smile, every shared story, every moment of support added warmth to our circle. Thank you for showing up, playing beside your little ones, and embracing the messy, magical, deeply human nature of outdoor play.
Your presence makes Nature Sprouts Adventure Club what it is.
❄️ Looking Ahead: Winter Adventures Await
As we transition into winter, we invite your families to continue exploring, noticing, and playing outdoors. Nature offers gifts in every season—quiet trails, frosty textures, early sunsets, and cozy indoor invitations to reflect on everything we've discovered.
We hope to see your little explorers again this winter as we step into a new season of imagination, discovery, and joyful learning. Returning families will receive a special 20% discount as our thank-you for being part of this fall’s journey.
Be sure to stay connected with us on social media and share your adventures—your stories help inspire other families to get outside, explore, and build deeper connections with nature.
Keep the Magic Going
Visit our other blog post to find:
Our Tea Time Recipe
Seasonal play ideas and resources
Updates on upcoming programs and community events
As we close the chapter on this beautiful fall, we carry forward gratitude—for nature, for our children, and for the community we’re building together.
Here’s to muddy hands, bright eyes, joyful mistakes, and endless wonder.
With love, light, and leafy smiles,
Tiayonna & The Nature Sprouts Adventure Club Team
🌱 “Let’s grow together, one adventure at a time.”

Real Christmas Tree vs. Artificial Tree: Which Is Better for the Environment (and for YOU)?

When the holiday season rolls in, so does one of the most heated debates in eco-friendly living: Is it better to buy a real Christmas tree or invest in a reusable artificial one?
From sustainability myths to family traditions, cost, and pure aesthetics, both options come with pros, cons, and a whole lot of emotion. Let’s break down the environmental impact, what the research says about consumer habits, and the key factors that will help you pick the tree that fits your holiday lifestyle.
The Real vs. Fake Tree Debate: What Most People Actually Choose
According to the American Christmas Tree Association (ACTA) and the National Christmas Tree Association:
75–80% of U.S. households use artificial trees.
Only 20–25% choose real trees each year.
Sales of artificial trees increase annually, while real tree sales fluctuate based on weather, availability, and cost.
So while many people claim to love the “fresh pine smell,” most households are decorating with a tree made of PVC and metal.
Environmental Impact: Which Tree Is Truly Greener?
This debate gets tangled fast, so let’s simplify it with research-backed insights.
✔️ Real Christmas Trees: The Eco Breakdown
Real trees are grown on farms just like crops—not plucked from pristine forests. They help support soil health, wildlife habitat, and small local farmers.
Environmental benefits of real trees:
100% biodegradable
Can be composted or chipped into mulch
While growing, each tree absorbs over 1 ton of CO₂ in its lifetime
Supports local agriculture
What about cutting them down?
For every tree harvested, U.S. growers plant 1–3 new trees, so the cycle continues sustainably.
Carbon footprint:
A real Christmas tree used for one season has an estimated footprint of around 3.5 kg CO₂ (mostly from transport).
✔️ Artificial Christmas Trees: The Eco Breakdown
Artificial trees are made from PVC plastic, steel, and sometimes lead-based stabilizers. They’re produced overseas, shipped across the globe, and are not recyclable.
Environmental concerns of fake trees:
Made of petroleum-based plastics
Will eventually end up in a landfill
Shipping emissions contribute heavily to carbon footprint
BUT—artificial trees can be eco-friendly if you keep them long enough.
Research shows you need to use an artificial tree for at least 8–10 years to offset the environmental impact of manufacturing and shipping.
Carbon footprint:
The average artificial tree has a footprint of 40 kg CO₂—or roughly 10x higher than a real tree per year unless it’s reused for a decade.
So… Which Tree Is More Environmentally Friendly?
The greener choice for most households is the REAL tree, especially if:
You buy from a local farm
You compost, mulch, or recycle it after the holidays
Artificial trees begin to make sense only if:
You reuse the same tree for 10+ years
You avoid cheaply made trees with higher toxic materials
You don’t have access to real tree recycling programs
In short: Real trees win, but long-term artificial tree users can still be responsible consumers with the right approach.
How to Choose the Right Tree for Your Lifestyle
Let’s be honest—not everyone is picking a tree solely based on carbon footprint. Your lifestyle, budget, storage space, kids, pets, and personal style all matter!
Here’s a simple guide:
Choose a REAL Tree If…
You love the smell of fresh pine and the nostalgia of tree farms
You want the lowest carbon footprint
You enjoy seasonal traditions
You want to support local growers
Your home doesn’t have long-term storage space
You can recycle or compost your tree locally
Budget: $60–$150 per year depending on size and region
Aesthetic vibe: Natural, cozy, imperfect, traditional
Choose an ARTIFICIAL Tree If…
You want a one-time investment rather than a yearly expense
You love symmetry and the “full, fluffy look”
You need a non-shedding, non-allergenic option
You prefer convenience and quick setup
You don’t have access to real-tree recycling programs
You plan to keep the tree 10 years or more
Budget: $100–$600 upfront
Aesthetic vibe: Polished, modern, perfectly shaped
✨ Extra Things to Consider
Allergies
Real trees may bring pollen or mold indoors. Artificial trees gather dust but don’t have natural allergens.
Pets
Cats often climb real trees but may also chew fake branches made of PVC. Choose wisely based on your pet’s personality.
Kids
Real trees create sensory experiences (texture, scent, tradition), but artificial trees can be more predictable and stable for toddlers.
Storage
Real trees require no storage at all. Artificial trees often need a large closet or attic space.
Fire Risk
Both tree types can be safe when maintained properly.
Real trees must be watered; artificial trees should be flame-retardant certified.
Final Thoughts: The Tree You Choose Should Bring You Joy
The “right” tree isn’t just the greenest option—it’s the one that fits your home, your traditions, your values, and your energy level during an already busy season. Whether you’re team fresh pine or team flawless faux, choose what works for your family—and don’t let anyone shame you for your decision.
Decorating a tree is about connection, memory-making, and creating a little holiday magic… not perfection.

How to Reuse Leftover Pumpkins as Natural Bird Feeders

Perfect for Migrating Birds, Backyard Wildlife & Your Garden
Fall is one of my favorite seasons on the homestead—cooler air, crisp mornings, and of course… pumpkins everywhere. Once Halloween and Thanksgiving pass, many families toss their pumpkins without a second thought. But if you’re anything like our crew, you know that a leftover pumpkin is not trash—it’s an opportunity for creativity, sustainability, and a little backyard magic.
This week, my 3-year-old and I turned our leftover pumpkins into natural pumpkin bird feeders, and it ended up being one of the sweetest moments of the season. We even filmed the whole process to share on YouTube next week, because this is exactly the kind of simple, joyful activity I love encouraging other families to try.
Not only does this project help reduce waste, but it supports migrating birds, enriches your garden soil, and offers a hands-on nature activity that little ones absolutely adore.
Here’s everything you need to know to create your own DIY pumpkin bird feeder this fall.
Why Make a Pumpkin Bird Feeder?
If you’ve never made a natural bird feeder before, prepare for something beautiful. Using pumpkins as feeders is more than a craft—it’s a tiny ecosystem moment. Here’s why this project is worth your time:
1. It Supports Migrating Birds
Autumn and early winter are critical for birds migrating through North Carolina and the Southeast. As temperatures drop, natural food sources become scarce. By offering nutrient-rich seeds in a feeder, you help birds build the energy they need to travel long distances.
2. It’s Completely Biodegradable
Unlike plastic or metal feeders, pumpkin feeders return to the earth naturally. When the pumpkin breaks down, you can compost it or simply let it decompose into the soil, adding organic matter back into your garden beds.
3. It’s a Fun, Hands-On Nature Activity for Kids
Toddlers and preschoolers love sensory-rich projects. Scooping out pumpkin seeds, tying yarn, adding birdseed—it’s all tactile, engaging, and easy to do together. My 3-year-old was SO proud to see our finished feeder hanging in the tree (and even more excited when the first chickadee found it!).
4. It Benefits Your Garden
Birds don’t just bring joy—they bring pest control. Attracting feathered friends improves your garden’s health year-round, especially as overwintering insects start to settle in.
What You Need (Most of It You Already Have!)
The best part of this pumpkin bird feeder DIY is that everything is simple, accessible, and often already in your home.
Leftover pumpkin (we used half of a medium pumpkin)
Knife (for an adult to cut the pumpkin safely)
Spoon or scoop for removing seeds
Bowl to collect seeds for roasting
Wooden dowel rods
Yarn, jute twine, or natural string for hanging
Birdseed mix
Tree branch to hang your feeder from
How to Make a DIY Pumpkin Bird Feeder (Step-by-Step Guide)
1. Prepare Your Pumpkin
Choose a pumpkin that’s still firm and not moldy. Cut it in half horizontally, creating a bowl-like shape. You want the bottom portion deep enough to hold birdseed without spilling.
2. Scoop Out the Inside
Let your kids help scoop—yes, it gets messy, but that’s the best part! Save the seeds in a bowl, clean them, and roast them later for a no-waste treat.
3. Insert Wooden Dowel Rods
Use a skewer or screwdriver to poke holes through each side of the pumpkin creating an “X” or cross. Slide wooden dowel rods through so they create little crossbars through the pumpkin. This supports the pumpkin when hung in the tree.
4. Attach the Hanging Strings
Cut four equal lengths of yarn or jute. Use a small knife to poke a hole near the top edge of the pumpkin, then tie each string securely to the dowel rods. Bring all four strings together and knot them at the top to create a hanger.
5. Fill with Birdseed
Pour in your favorite seed blend. Black oil sunflower seeds, millet, and cracked corn are great for local birds.
6. Hang It in a Safe Spot
Choose a tree branch high enough to avoid cats or other predators. Make sure it’s sturdy and visible so you and your kids can watch birds enjoy their treat.
Why Birds Love Pumpkin Feeders
Pumpkins are naturally appealing to birds:
They provide a stable, shallow bowl shape
The edges give birds a natural place to grip
Some species may even peck at the pumpkin flesh for moisture and nutrients
Plus, pumpkin feeders blend beautifully into the landscape—no need for bright plastic or store-bought materials.
Pumpkin Feeders and Garden Ecology
When the pumpkin begins to break down (usually after about a week or two), you can simply compost it or bury it in a garden bed. Earthworms, soil microbes, and fungi will break it down and turn it into organic matter that boosts soil structure and fertility.
Birds also contribute to garden health by:
Eating overwintering pests
Spreading seeds
Providing natural aeration as they scratch and forage
Everything works in a cycle—and this little feeder plays a surprisingly meaningful part.
A Beautiful Activity to Share With Your Kids
One of my favorite parts of homesteading is weaving small, meaningful rituals into our everyday life. This simple project gave my daughter and me a moment to slow down, talk about the birds migrating overhead, and learn about how our actions can help care for the world around us.
Crafts like this help kids develop:
Fine motor skills
Sensory exploration
Environmental awareness
Empathy for wildlife
A sense of responsibility and pride
And honestly? It’s just plain joyful.
(If you want to see our version step-by-step, keep an eye out for the YouTube video dropping this week!)
Final Thoughts: A Simple, Eco-Friendly Way to Reuse Leftover Pumpkins
Reusing leftover pumpkins as natural bird feeders is one of those perfect fall activities—eco-friendly, budget-friendly, kid-friendly, and beneficial to the garden and local wildlife. If you’re looking for a fun, meaningful project to do with your kids this season, this is it.
Hang one up, watch the birds swoop in, and enjoy a moment of nature-filled magic right in your backyard.

Packing the Perfect Fall Nature Adventure Backpack
There’s something truly magical about fall hikes in North Carolina — the crisp air, the crunch of leaves under little boots, and the explosion of color that paints our favorite nature trails.
A Gear Guide for Cooler, Leaf-Covered Trails
There’s something truly magical about fall hikes in North Carolina — the crisp air, the crunch of leaves under little boots, and the explosion of color that paints our favorite nature trails. But with that beauty comes a bit of planning. The temperatures can change quickly, trails can get damp, and those tiny explorers (and let’s be honest — us parents too!) can get hungry, chilly, or muddy fast.
If you’re joining us for our free monthly Nature Sprouts Adventure Club hike this weekend, or simply planning your own fall nature day with the kids, this guide will help you pack the perfect fall adventure backpack — so you can focus on fun and connection, not forgotten mittens.
Why Fall Hiking is Special (and Needs a Little Extra Prep)
Fall is one of the most comfortable times to hike in the Triangle area — fewer bugs, fewer crowds, and endless opportunities for leaf collecting, animal tracking, and puddle jumping. But autumn weather can be tricky. Mornings often start cool and damp, then warm up by mid-day. That means your backpack needs to work double-time — carrying layers, snacks, and supplies to keep everyone happy on the trail.
The right preparation turns a good hike into a great one — filled with learning, laughter, and connection with the natural world.
What to Pack in Your Fall Nature Adventure Backpack
Here’s a tried-and-true list of fall hiking essentials for families — all tested by our Nature Sprouts families who love to play, explore, and learn outdoors.
1. Layered Clothing Essentials
Fall weather changes fast! Pack:
A lightweight, long-sleeve base layer for everyone
A fleece or sweatshirt for warmth
A waterproof or wind-resistant outer layer
Extra socks (wet leaves happen!)
A warm hat or headband — even for kids who say they “don’t need one”
Pro tip: Pack an extra plastic grocery bag for storing muddy clothes or wet shoes after the hike.
2. Hydration + Healthy Snacks
Even in cooler weather, kids (and adults) need plenty of water.
Pack:
Refillable water bottles or small hydration packs
A thermos of warm herbal tea or apple cider for post-hike sipping
Trail-friendly snacks like:
Apple slices + nut butter
Mini muffins
Granola bars
Roasted chickpeas
Dried fruit
Avoid high-sugar snacks — they spike energy, then crash mid-trail.
3. Nature Tools for Curious Explorers
Encourage hands-on discovery! Bring along:
A small magnifying glass or loupe
Field journal or nature observation cards
Pencil or crayons for sketching finds
A reusable bag or box for “nature treasures” (like fallen leaves or pinecones)
If your child is part of the Nature Sprouts Adventure Club, this is a perfect time to bring their Adventure Passport or Field Notes booklet to record what they see.
4. Safety + Comfort Items
A well-packed first aid kit can save the day. Include:
Band-aids, antiseptic wipes, and tweezers
Sunscreen + bug spray (yes, even in fall!)
Hand sanitizer or wipes
A whistle for kids to carry on a lanyard (great safety skill practice!)
Small pack of tissues or biodegradable wipes
Compact blanket or sit-mat for snack breaks
5. Tech + Navigation (Optional but Helpful)
If you’re venturing on a new trail:
Download offline maps using AllTrails or Google Maps before you go
Carry a portable phone charger
Take a photo of the trailhead map before heading out
Bonus: Bring a small camera so kids can practice nature photography
6. Fun Add-Ons for Fall Adventures
These little extras make the experience magical:
Binoculars for spotting birds or squirrels
Mini magnifier jars for safe insect observation
Reusable hand warmers for chilly fingers
Lightweight picnic blanket for spontaneous snack breaks
Small reusable tote for collecting litter — teaching “leave no trace” habits early
Family Fall Hike Packing Checklist
Want to keep it simple? Here’s your one-look list to check before you head out:
✅ Weather-appropriate layered clothing
✅ Water + snacks
✅ First aid + hand wipes
✅ Nature tools (journal, magnifier, bag)
✅ Blanket or mat
✅ Extra socks + plastic bag for wet gear
✅ Phone/camera + trail map
✅ Trash bag for cleanup
Local Tip: Where to Go for Fall Family Hikes in the Triangle
Some of our favorite kid-friendly fall trails include:
Durant Nature Preserve (Raleigh): Wide paths, shady woods, and a beautiful lake loop.
Annie Louise Wilkerson Nature Preserve (Raleigh): Perfect for younger explorers with short, engaging loops.
Eno River State Park (Durham): Vibrant foliage and shallow creek crossings for leaf boat races.
Bond Park (Cary): Great mix of forest and open spaces, plus playgrounds for post-hike playtime.
Building Connection Through Nature
When families hike together, kids learn more than plant names or trail safety. They learn patience, confidence, and curiosity — the heart of what we nurture at Nature Sprouts Adventure Club. Every crunchy leaf, bird call, and muddy handprint is a moment of growth and memory-making.
So, grab that backpack, check off your list, and come explore with us!
Our Free Monthly Family Hike is happening this weekend — and we’d love for you to join us. You’ll meet other nature-loving families, learn fun outdoor skills, and soak in the last of fall’s golden glow before winter sets in.
RSVP today through our website or via our link in bio on Instagram @nature_sprouts_adventure_club to save your spot.
See you (and your perfectly packed backpack!) on the trail.
Planning & Preparing – Know Your Climate Before You Grow
Before you ever drop a seed into the soil, there’s one step that separates successful gardeners from frustrated beginners: understanding your climate.

Before you ever drop a seed into the soil, there’s one step that separates successful gardeners from frustrated beginners: understanding your climate.
At My Carolina Homestead, we believe that gardening isn’t about copying what works on social media — it’s about learning what works where you live. Your climate determines everything: when you plant, what you plant, and how you care for it. Whether you’re growing on a balcony, a backyard, or a full-sized homestead, knowing your local conditions helps you garden smarter, not harder.
Why Knowing Your Climate Matters
Think of your garden like a relationship — if you don’t take time to understand it, it probably won’t thrive.
Your climate zone, microclimate, and seasonal weather patterns dictate how plants grow. Knowing these key details allows you to choose the right plants, plant them at the right time, and give them the care they need to flourish.
Here in Zone 8a (the Piedmont region of North Carolina), for example, we enjoy long growing seasons, mild winters, and hot, humid summers. That means we can grow cool-season crops like lettuce and broccoli in early spring and fall, and heat-lovers like tomatoes, peppers, and okra in summer.
Without understanding that rhythm, many beginners end up planting too early, too late, or choosing varieties that can’t handle our heat or humidity.
Step 1: Find Your USDA Plant Hardiness Zone
Your USDA Hardiness Zone is the starting point for understanding your climate. This map divides North America into zones based on the average annual minimum winter temperature.
Here’s how to find yours:
Go to planthardiness.ars.usda.gov.
Enter your ZIP code.
Note your zone number (for example, Zone 8a = 10–15°F minimum winter temps).
Once you know your zone, you can choose plants that are hardy for your area. Many seed packets and plant tags include this information, helping you make smarter choices from the start. That’s all this little number tells you as a home gardener, but it’s still pretty important to know!
Step 2: Understand Your Microclimates
Even within the same zone, no two gardens are identical. Microclimates are small pockets of varying temperature, light, and moisture — like the shady side of your house, a sunny patio, or a low spot where water collects.
Here at My Carolina Homestead, we encourage new gardeners to observe their space for at least a week before planting:
Watch where the sun hits morning and afternoon.
Notice which areas stay damp after rain.
Pay attention to wind direction and frost pockets.
Knowing your microclimates helps you place plants where they’ll thrive — like putting heat-loving herbs near a south-facing wall or tucking lettuces into cooler, shaded corners.
Step 3: Track Your Frost Dates
Your first and last frost dates tell you when it’s safe to plant tender crops and when to expect your growing season to end.
In Zone 8a, our average last frost is around mid-March, and our first frost usually comes in early November. That gives us a long window to grow spring, summer, and even fall gardens.
Mark these dates on your gardening calendar. When in doubt, plant in succession — sowing seeds every few weeks — to stretch your harvest and hedge against weather surprises.
Step 4: Learn Your Soil and Rain Patterns
Your soil and rainfall go hand in hand with climate. North Carolina’s red clay soil, for instance, is rich in nutrients but can be heavy and slow-draining. Understanding that helps you know whether to amend with compost, raise your beds, or add mulch to retain moisture during hot spells.
Here’s how to start:
Test your soil. You can send samples to the North Carolina Department of Agriculture for free most of the year.
Track rainfall. Most plants need about 1 inch of water per week. Use a rain gauge or even an old can to measure how much nature provides.
Adjust your watering habits based on season — less in cool months, more in high summer.
When you know your soil and water patterns, you waste less time, money, and effort.
Step 5: Choose Plants That Fit Your Climate
Once you understand your zone and soil, you can choose plants that thrive where you live. Here are a few examples for Zone 8a gardeners:
🌿 Spring: Lettuce, peas, kale, carrots, radishes
🌼 Summer: Tomatoes, peppers, basil, zinnias, okra
🥬 Fall: Broccoli, collards, spinach, beets, garlic
🌱 Winter: Cover crops like crimson clover or winter rye
Planting what fits your climate means less struggle — and a healthier, more productive garden.
The 5 for 5 Gardening Method
At My Carolina Homestead, we teach gardening using our 5 for 5 Method — a simple, sustainable system that helps you grow confidently even as a beginner.
The five pillars are:
Plan – Know your climate, space, and goals.
Build – Create a healthy foundation with soil prep and structure.
Implement – Plant smartly using your zone and frost dates.
Maintain – Water, mulch, and manage pests organically.
Record – Track your results and learn from each season.
By following this cycle, you’ll grow a garden that fits your life and your local environment — one that feeds both your family and your soul with just five minutes a day.
Bring It All Together
Planning and preparation are the quiet heroes of gardening success. When you understand your local climate and work with nature instead of against it, you set yourself up for a thriving, low-stress garden.
Whether you’re growing a few pots of herbs or a full backyard vegetable patch, take time to observe your environment, learn your zone, and plan for success. Every garden starts with knowledge — and that’s something we can all cultivate.
Ready to Grow with Us?
If you’re just starting your garden journey, we’d love to walk alongside you. 🌿
Join our free Modern Homesteading Mamas community to get tips, tricks, and tutorials on gardening the 5 for 5 style— all in one place or delivered straight to your inbox. You’ll learn how to grow smarter, save money, and feel confident from seed to harvest. Better yet have us come out and get your garden started for you!
👉 Join today and get the full “How To Start A Garden” Series Checklist to start your garden the My Carolina Homestead way!
Start your garden journey off on the right foot— find the full know your climate kit in our Garden Companion Journal!

Our Family Costume Reveal: DIY Huntrix & Bobby the Manager Halloween Look
Our family brought Netflix’s K-Pop Demon Hunters to life this Halloween with DIY Huntix and Bobby costumes made from thrifted and repurposed pieces. Stylish, sustainable, and full of family fun — see how we recreated this fierce look while waiting for news on K-Pop Demon Hunters 2!
Family cosplay meets creative reuse — our K-Pop demon-hunter Halloween adventure!

This year, we went a little off the beaten path for Halloween and dove straight into the world of K-Pop Demon Hunters, the wildly popular animated film on Netflix. If you haven’t watched it yet — put it on your list! It’s got action, music, friendship, and a seriously stylish aesthetic that’s impossible not to love.
All the costume options were amazing, but I wanted something I could pull together easily and repurpose later, so we recreated the first demon-hunting scene — the one where the girls first encounter the Saja Boys and realize they’re demons.
They show up dressed in slick black leather suits adorned with silver chains, spikes, and purple accents — ready to slay (literally and figuratively). They think they’re showing up for a “play games with us” variety show but quickly get tricked into actually playing the games — which, of course, spirals into an epic bathhouse battle with water demons. And that’s when Jinu discovers that Rumi is part human, part demon… but that’s all I’ll spoil! 😈
Rumi — Our Oldest Daughter’s Look
Our oldest embodied Rumi, the fierce, loyal, and part-demon leader of the Huntrix team. I styled her in a long-sleeve black bodysuit with waist chains, silver accessories, and Rumi’s signature long purple braid.
Now, let me just say — that braid took way longer than I expected. I don’t know why I thought it would be easy since braiding and styling hair isn’t exactly my strong suit! 😅 But with some yarn, patience, a few tears and a lot of laughs, we made it happen. And once that braid was in place, she looked absolutely perfect.

Mira — Our Youngest’s Look
Our youngest dressed as Mira, and let me tell you — the attitude fit the role perfectly!
For her costume, I pieced together a ballet leotard, kids’ ballet tights, and a simple black ballet skirt — all of which will come in handy later since she’s been asking about dance lessons (and I think those may just show up under the Christmas tree 🎁).
We finished off her look with a pink wig tied up using pink scrunchies, just like Mira in the movie. She owned it.

Zoey — My Look
I took on Zoey, the stylish and strategic fighter of the crew. I kept things simple and comfy with a black onesie, black tights, and a ballet skirt, echoing that sleek, fight-ready silhouette from the film.
To pull everyone’s look together, I dismantled a couple of thrifted silver and beaded necklaces to create chain accents for all of us. For the purple details, I grabbed some yarn and chain-stitched waist jewelry and bracelets — simple touches that gave our outfits that signature Huntix energy.
Bobby the Manager — My Husband’s Look
Hubby pulled off Bobby the Manager effortlessly. His costume came together with a gray sports jacket, a conference badge (with a paper insert I printed from online), and — the finishing touch — the exact matching Huntix T-shirt from the movie, which he ordered online.
We all became absolutely obsessed with K-Pop Demon Hunters when it first aired — I’m talking watched-it-a-thousand-times-obsessed. 😂 So when it came time to pick a Halloween theme, there was really no question. We’re also eagerly (and impatiently) awaiting news about K-Pop Demon Hunters 2 — no release date yet, but we’ll be ready the moment it drops!
Finishing Touches
Every good demon hunter needs solid footwear, so we rounded out our costumes with new black combat boots for everyone. It was perfect timing since we all needed new fall boots anyway — and now we’ll be wearing these long after Halloween.
Between the recycled accessories, multi-use wardrobe pieces, and creative repurposing, this was one of my favorite DIY family costumes ever.
💜 Final Thoughts
I loved how this year’s costumes came together — stylish, comfortable, and full of personality. The girls were thrilled to be their favorite Huntix characters, hubby loved being Bobby, and I loved that it didn’t require spending a fortune or generating waste.
Our DIY Huntrix family costume was a total win — proof that with a little imagination (and maybe a few thrifted necklaces), you can create something unforgettable.
If you try this look or do your own K-Pop Demon Hunters cosplay, tag me at @mycarolinahomestead — I’d love to see your take!

Our Family-Friendly Halloween Yard Decor on the Homestead
Welcome to our homestead Halloween, where sustainability meets spooky fun! This year we transformed our front yard into a family-friendly Halloween wonderland using mostly recycled and repurposed materials. From glowing tomato cage ghosts to our giant DIY spider web and inflatable friends, every corner of our yard tells a story of creativity and connection. We love making Halloween magical for our kids while keeping it eco-friendly and budget-conscious. In this post, you’ll find inspiration for reusing old décor, making simple ghost lights, and creating a cozy Halloween atmosphere that fits the homestead lifestyle. Whether you’re decorating your first garden or sprucing up your porch, these easy ideas will help you celebrate the season with joy — and just the right touch of spooky.
Creating spooky magic, sustainable style, and sweet memories — one pumpkin at a time.

There’s something about Halloween on the homestead that just hits differently. Maybe it’s the crisp fall air, the crunch of leaves under little feet, or the way the kids’ laughter carries across the yard as we hang spider webs and stake our ghosts into the ground. However it happens, every year I find myself caught between wanting to go full “haunted house” and keeping things simple, sustainable, and family-friendly.
This year, we struck the perfect balance — a little spooky, a little silly, and a whole lot of homestead magic.
Planning a Spooktacular Yet Simple Setup
As much as I love a good Halloween Pinterest board, I didn’t want our yard to feel like something out of a Halloween store catalog. I wanted it to feel like us. So, I leaned into things we already had on hand — tomato cages, garden stakes, leftover fabric, and even a few twinkle lights from summer evenings on the porch.
We reused, repurposed, and got creative (because homesteading life is all about working with what you’ve got, right?).
My favorite project of all might just be our tomato cage ghosts — tall, glowing, and surprisingly easy to make! We flipped our garden tomato cages upside down, added a string of white lights, and draped a thrifted sheer curtain over the top. A little black HTV for the face completed the look, and just like that, we had a couple of ghostly guards watching over the yard.

And of course, no Halloween at our place would be complete without our two larger-than-life inflatables: a giant spider and a giant snake! The spider especially shines thanks to the massive DIY web it rests on — a project I actually shared on YouTube a few years back. We made it using simple materials and have reused it every Halloween since.
Between the glowing ghosts, giant web, and those fun inflatables, our yard has this magical mix of whimsy and wow — and I love that nearly everything ties back to reusing what we already had.
Keeping It Eco-Friendly and Kid-Approved
Halloween can get wasteful fast — plastic décor, disposable costumes, candy wrappers everywhere. So this year, we made it a point to use what we already had and get the kids involved in making decorations.
Some suggestions:
Painted old jars into glowing pumpkin lanterns using solar tea lights
Stuffed “ghosts” with old grocery bags instead of new stuffing
Repurposed our garden stakes for yard signs
Used real pumpkins from our garden and local farms for décor (and composted them afterward!)
Our girls had a blast crafting “boo signs,” helping hang spider webs on the porch, and finding sticks to create broomsticks for our pretend witch’s corner. It wasn’t just decorating — it was a full-on sensory experience.
And I love that our yard tells a story. It’s not just about scaring — it’s about creating joy, wonder, and connection.
Family Traditions That Grow With Us
What I love most about this season is how it reminds us to play together. The kids don’t care if our ghosts are perfectly symmetrical — they care that we made them together.
After the decorating was done, we celebrated with a little outdoor movie night under the stars — cozy blankets, popcorn, and my new favorite Halloween snack: BOOnanas (frozen bananas dipped in white chocolate and dotted with mini chocolate chip eyes 👻). Simple, healthy, and adorable.
Those little moments — sticky fingers, giggles, and ghostly snacks — are what make homesteading life so rich.
Halloween Fun Beyond the Homestead
While our yard has been glowing with spooky charm all week, we also carried that Halloween spirit with us on a special family adventure this season — one filled with pumpkins, pixie dust, and a little extra magic. Let’s just say it involved a certain famous mouse and some not-so-spooky fun!
You’ll get to see it all soon in our next YouTube vlog, where we share how we bring our same homestead values — creativity, sustainability, and family-first fun — wherever we go.
Stay tuned for that magical look behind the scenes, coming next week!
👻 Want to Try Our DIYs?
Check out these fun projects featured in this post:
From our homestead to yours — wishing you a happy, safe, and spooky Halloween filled with love, laughter, and a little bit of ghostly glow.
With pumpkins and love,
Tiayonna

5 Easy Nature Play Activities for Fall
Simple ways to connect kids with the changing seasons — and boost their development in the process.

As the air turns crisp and the leaves begin to fall, nature becomes one big playground waiting to be explored. Fall is the perfect time to get outside, slow down, and let kids experience the wonder of the changing world around them. The best part? You don’t need fancy supplies or big plans — just curiosity, a few minutes outdoors, and the willingness to get a little messy.
Here are five easy fall nature play ideas that work beautifully for children ages 1 to 8, encouraging creativity, sensory learning, and overall wellness.
1. Leaf Treasure Hunt
What to do:
Grab a small basket or bag and go on a leaf hunt! Ask your child to find as many different shapes, sizes, and colors as they can. Older kids can sort them by type or color, while younger ones can simply collect and explore the textures.
Development boost:
This activity supports observation skills, classification, and fine motor coordination. It also encourages mindfulness — kids begin to notice small seasonal changes and appreciate nature’s beauty.
Wellness tie-in:
The act of slowing down and focusing on natural details can reduce stress and improve focus — even for adults! It’s a grounding sensory experience that encourages calm and curiosity.
2. Acorn & Pinecone Kitchen
What to do:
Set up a pretend “forest café” with acorns, pinecones, sticks, and leaves as ingredients. Add a few bowls, spoons, or cups from your outdoor play kit. Let the kids “cook” and create their own forest-inspired meals.
Development boost:
Pretend play strengthens imagination, language skills, and social-emotional growth. Kids learn to cooperate, communicate, and think creatively.
Wellness tie-in:
Imaginative play helps children process emotions and build confidence while engaging multiple senses — touch, sight, sound, and even smell — for a full sensory experience outdoors.
3. Nature Paintbrushes
What to do:
Collect sticks, pine needles, and leaves. Tie (or rubber band) them to one end of the stick to create unique paintbrushes. Use washable paint or mud to make fall art on paper, cardboard, or rocks.
Development boost:
Encourages fine motor skills, creativity, and hand-eye coordination. It also helps kids explore cause and effect — seeing how different textures leave different marks.
Wellness tie-in:
Art in nature is both soothing and expressive. It’s a mindful way to relieve stress and encourages children to find beauty in imperfection and process over product.
4. Fall Sensory Soup
What to do:
Fill a large bowl or bucket with water and invite your kids to add “ingredients” — flower petals, grass, pine needles, berries (safe ones only!), bark, and small stones. Provide spoons or ladles to stir.
Development boost:
Builds sensory awareness, scientific thinking, and language development as they talk about textures, colors, and smells.
Wellness tie-in:
Sensory play helps regulate emotions and fosters a sense of calm. The simple act of stirring and creating can be meditative, helping children (and caregivers!) slow down and tune into the moment.
5. Build a Fairy (or Critter) Home
What to do:
Gather natural materials like sticks, bark, leaves, and stones to build a small home for fairies, forest animals, or insects. Encourage creativity and problem-solving as they design and construct their space.
Development boost:
Enhances spatial awareness, problem-solving, and cooperative play. Building structures promotes engineering and design thinking in a playful way.
Wellness tie-in:
Working collaboratively in nature helps children build empathy — for both living things and each other. It reminds them that they are part of a larger ecosystem and sparks a sense of belonging and stewardship.
A Final Thought
Fall is fleeting — and so are the childhood seasons. Each moment spent outside collecting leaves, stirring a “soup,” or building a tiny woodland home strengthens your child’s body, mind, and heart. The more we connect with the natural world, the more balanced and grounded we all become.
So grab your jacket, step outside, and let nature do its magic — one crunchy leaf at a time. 🍁

DIY Tomato Cage Ghosts: Easy, Budget-Friendly Halloween Decor for Your Yard
Turn leftover tomato cages into glowing ghosts with this fun, eco-friendly Halloween DIY! This simple, sustainable project adds spooky charm to your yard while teaching kids the joy of reusing what you already have.
Creating glowing ghosts from garden scraps — the ultimate upcycled Halloween magic!
If you’ve been around My Carolina Homestead for a while, you know we love decorations that don’t break the bank orclutter the planet. Every season, I challenge myself to use what’s already lying around the house or garden to create something new and fun with the kids.
This Halloween, we turned our leftover tomato cages from the summer garden into glowing ghosts — and honestly, I’m obsessed. These cute little specters light up our yard at night and add the perfect mix of spooky and sweet to our family-friendly display. Plus, they’ve now become a must-have part of our Halloween setup every year.
Why We Love This DIY
Not only is this one of the easiest Halloween crafts you can make, but it’s also incredibly sustainable. Instead of buying new décor, you’re repurposing garden tools that would otherwise sit unused all winter.
And if you’ve got kids, this project is a win-win:
🖐️ Easy enough for them to help.
✨ Involves lights (and we all know how kids feel about glowing things).
🌎 Teaches the value of creativity and reuse.
Materials You’ll Need
Most of these are things you probably already have on hand:

1 tomato cage (any size works, but tall ones look extra spooky!)
1 sheer white curtain, tablecloth, or old sheet (thrifted is perfect!)
1 strand of white, warm, or colored LED string lights
Black felt or construction paper, or HTV (for ghost face)
Styrofoam Sphere to help shape the head
Zip ties or twist ties (to secure the cage)
Optional: small battery pack if your lights aren’t solar or plug in
Step-by-Step Instructions
1️⃣ Flip Your Tomato Cage & Add Half Sphere
Turn the cage upside down so the wide base is on top and the pointy ends are at the bottom. Secure the three wire tips together at the top with a zip tie or twist tie. Securely place the halved sphere on top of the tomato cage prongs. This will create your “ghost head” shape.
2️⃣ Add the Lights
Starting at the top, wrap your string lights around the cage evenly. You can go for a tight wrap for a brighter glow or keep them spaced for a subtle shimmer.
(Tip: If your lights have a plug, make sure to position it toward the bottom so it’s easy to plug in outside.)
3️⃣ Drape Your Fabric
Lay your curtain, tablecloth, or sheet over the cage so it falls naturally. Adjust until it feels flowy and ghost-like. I like to use sheer curtains because the lights shine beautifully through at night.
4️⃣ Give Your Ghost a Face
We use the Cricut and HTV to add a face to our ghost but if you don’t have these materials and tools handy you can easily cut out eyes and a mouth from black felt or paper and attach them to the fabric with glue dots or tape. You can go cute or spooky
5️⃣ Light It Up!
Plug in or turn on your lights and watch your ghost come to life. Ours glow just bright enough to light the walkway without being too scary.
💡 Bonus Tips & Variations
Use white or colored lights (purple ) for a different spooky glow.
Add a hat, bow tie, or scarf for personality.
Stake them in your garden or line your driveway for an adorable haunted entrance.
Group three different sizes together for a little ghost “family.”
Storage & Reuse
At the end of the season, remove the fabric and fold it neatly for next year. Wrap up your lights and store them inside the tomato cage to save space if necessary— it’s the easiest way to keep everything together for next time!
We’ve used the same ghosts for three years now, and they still look brand new.
A Touch of Homestead Magic
What I love most about these tomato cage ghosts is how they blend the homestead life with simple seasonal fun. They’re proof that you don’t need fancy décor or big budgets to create something beautiful — just a little imagination and a few garden leftovers.
It’s the kind of project that reminds me why I love this lifestyle so much: making memories, reusing resources, and finding joy in the simple things.
If you make your own tomato cage ghosts, tag me on Instagram @my_carolina_homestead — I’d love to see your spooky creations!